Building a Secure PKI for MQTT using OpenSSL: Root CA, Intermediate CA, and Server Certificates
Transport security is a fundamental requirement for any MQTT-based system, especially in IoT and industrial environments where devices often operate unattended and over public networks. TLS provides encryption and authentication, but its security ultimately depends on a well-structured Public Key Infrastructure (PKI).
In this post, we build our own PKI from scratch using OpenSSL. We create a Root CA, an Intermediate CA, and server certificates suitable for securing MQTT connections - independent of any specific MQTT broker. At the end, we add our server certificate to our ThingsBoard configuration. The presented procedure is not limited to ThingsBoard server instances, it can be used with other MQTT servers, as well.
What you get
This guide explains how to setup a personal Public Key Infrastructure (PKI), which in the end can be used to enable MQTT-over-TLS for self hosted ThingsBoard instances. We focus on practical decisions such as key types (EC vs. RSA), certificate chains, and certificate extensions. We do not cover x.509 certificate based authentication for client devices.
1. Directory layout
The following sections start with the directory layout used throughout this guide and then walk step by step through key generation, certificate signing, and validation.
We will generate three key-pairs:
- Root CA (root-ca)
- Intermediate CA (server-ca)
- MQTT Server key pair (mqtt-server-1) for one MQTT server
Let’s start by creating the following directory layout, this keeps keys separated and avoids mistakes:
ecpki/
│
│   # Root CA
├── root-ca/
│   ├── private/
│   └── certs/
│
│   # Intermediate CA
├── server-ca/
│   ├── private/
│   ├── certs/
│   └── csr/
│
│   # Server certificate and key
└── mqtt-server-1/
    ├── private/
    ├── certs/
    └── csr/
We will create a certificate chain looking like this:
Root CA
    |
    +-- Server Intermediate CA
        |
        +-- MQTT Server Certificate(s)
We follow the ThingsBoard’s documentation advice on key generation and create our keys based on elliptic curve cryptography (instead of RSA).
The elliptic curve key generation can be used consistently across the entire PKI hierarchy – from Root CA to server certificates. The certificate’s role is determined by extensions, not by the key type.
Why ECC is considered better for IoT compared to RSA
Elliptic Curve cryptography (e.g. ECDSA with P-256) provides the same or higher security level as RSA with much smaller keys, resulting in faster TLS handshakes, lower CPU usage, reduced bandwidth and memory requirements. These properties make EC well suited for IoT devices and mobile clients, which often have limited hardware resources or require low power consumption (especially devices running on battery). Modern TLS stacks (TLS 1.2 and TLS 1.3) are optimized for EC-based cipher suites, while RSA is increasingly seen as legacy for new deployments.
Further readings
- NIST SP 800-57 Part 1 – Recommendation for Key Management: https://nvlpubs.nist.gov/nistpubs/SpecialPublications/NIST.SP.800-57pt1r5.pdf
- Cloudflare – A Primer on Elliptic Curve Cryptography: https://blog.cloudflare.com/a-relatively-easy-to-understand-primer-on-elliptic-curve-cryptography/
2. Offline Root CA (created once)
The Root CA consists of a private and public key (certificate). Its only purpose is to sign intermediate certificates.
2.1 Root CA private key
The private key is created as follows:
openssl ecparam -out root-ca/private/root-ca.key.pem -name secp256r1 -genkey
chmod 400 root-ca/private/root-ca.key.pem
This key stays offline forever.
2.2 Root CA certificate (self-signed)
Here, we create the public key (certificate) with the required information. We provide the country code (C=) for our entity, an organization name (O=) and a common name (CN=) for our CA.
openssl req -x509 -new -nodes \
  -key root-ca/private/root-ca.key.pem \
  -sha256 -days 3650 \
  -out root-ca/certs/root-ca.cert.pem \
  -subj "/C=DE/O=My IoT Cloud/OU=PKI/CN=My IoT Cloud Root CA"
As soon as our certificate is created, we can look into it:
openssl x509 -in root-ca/certs/root-ca.cert.pem -noout -text
This command displays the Root CA certificate in a human-readable format, allowing you to inspect its details (such as public key, validity period, issuer/subject, etc.) to ensure it is correctly configured before further usage.
3. Server Intermediate CA
Next, we create an intermediate CA whose sole responsibility is signing server certificates. This additional layer allows the intermediate CA to be rotated or renewed without requiring any changes on client devices, since the trusted Root CA certificate (distributed as a CA bundle) remains unchanged.
3.1 Intermediate CA private key
Same as before – generating a private key…
openssl ecparam -out server-ca/private/server-ca.key.pem -name secp256r1 -genkey
chmod 400 server-ca/private/server-ca.key.pem
3.2 Intermediate CA CSR
… and the corresponding public key (as a certificate signing request).
openssl req -new \
  -key server-ca/private/server-ca.key.pem \
  -out server-ca/csr/server-ca.csr.pem \
  -subj "/C=DE/O=IoT Cloud Server/OU=PKI/CN=IoT Cloud (MQTT) Server CA"
This step generates a Certificate Signing Request (CSR). The CSR contains the public key and all required certificate metadata in a standardized format, allowing the request to be reviewed and signed by our Root CA.
Check CSR
We can look into the CSR, as well – it does not contain any signature yet!
openssl req -in server-ca/csr/server-ca.csr.pem -noout -text
3.3 Sign intermediate CA with Root CA
In this step, we sign the intermediate CA certificate using the Root CA. This establishes the first link in the chain of trust, providing cryptographic proof that the intermediate CA is authorized by the trusted Root CA.
openssl x509 -req \
  -in server-ca/csr/server-ca.csr.pem \
  -CA root-ca/certs/root-ca.cert.pem \
  -CAkey root-ca/private/root-ca.key.pem \
  -CAcreateserial \
  -out server-ca/certs/server-ca.cert.pem \
  -days 1825 \
  -sha256 \
  -extfile root-ca/signcsr.conf
With root-ca/signcsr.conf containing following information:
basicConstraints = critical, CA:TRUE, pathlen:0
keyUsage = critical, keyCertSign, cRLSign
subjectKeyIdentifier = hash
authorityKeyIdentifier = keyid, issuer
Defining certificate usage constraints
While signing, the Root CA applies different constraints on the certificate to limit or define its future use. These constraints are applied through a config file.
Let’s look into the configuration parameters we defined for our intermediate CA.
| Extension | Purpose |
|---|---|
basicConstraints | Declares CA role |
keyUsage | Restricts key actions |
subjectKeyIdentifier | Identifies this cert |
authorityKeyIdentifier | Identifies issuer |
Basic Constraints
CA:TRUE: this certificate is allowed to sign other certificates, it is allowed to act as a Certificate Authoritypathlen:0: this CA issues leaf certificates only (cannot create another CA)critical: clients must understand this extension or reject the cert
Key Usage
keyCertSign: may sign certificates (mandatory for a CA, as this is its main purpose)cRLSign: may sign Certificate Revocation Listscritical: enforced strictly
Subject Key Identifier
hash: creates a unique fingerprint of this certificate’s public key (recommended by RFC 5280)
Authority Key Identifier
keyid: references the Root CA’s Subject Key Identifierissuer: includes issuer DN info
The intermediate certificate can be rotated (renewed) without touching the devices (because only the Root CA certificate will be included in the ca-bundle which is given to the devices).
Look into certificate:
openssl x509 -in server-ca/certs/server-ca.cert.pem -noout -text
And you will see that it is signed (issued) by the previously generated Root CA and includes the given constraints:
openssl x509 -in server-ca/certs/server-ca.cert.pem -noout -text | grep -i "Issuer:"
4. MQTT Server Key & Certificate (ThingsBoard)
Let’s create the key, certificate and chain for the MQTT server. The MQTT server presents the server certificate together with the certificate chain to client devices during the TLS handshake. These will be added to the server configuration.
4.1 MQTT Server (ThingsBoard) private key (ecparam)
Create the server private key. We are creating an EC based private key here (same as for the previous keys) because EC has some advantages for IoT devices (as described above).
openssl ecparam -out mqtt-server-1/private/mqtt-server.key.pem -name secp256r1 -genkey
chmod 400 mqtt-server-1/private/mqtt-server.key.pem
4.2 MQTT Server (ThingsBoard) CSR
Create the MQTT server certificate signing request (CSR) and include the required SANs. The SANs are required by newer TLS standard and therefore should be included in the CSR, as the principle states:
The CA signs what the requester asked for
openssl req -new \
  -key mqtt-server-1/private/mqtt-server.key.pem \
  -out mqtt-server-1/csr/mqtt-server.csr.pem \
  -config mqtt-server-1/mqtt-server.csr.conf
For better clarity I defined the SANs and certificate properties in a separate config file (under mqtt-server-1/mqtt-server.csr.conf), which is attached to the openssl command using -config mqtt-server-1/mqtt-server.csr.conf. My config looks like this:
[ req ]
prompt             = no
default_md         = sha256
distinguished_name = dn
req_extensions     = req_ext

[ dn ]
C  = DE
O  = my IoT Cloud Organization
CN = my-iot-cloud.com

[ req_ext ]
subjectAltName = @alt_names

[ alt_names ]
DNS.1 = my-iot-cloud.com
DNS.2 = mqtt.my-iot-cloud.com
DNS.3 = my-iot-cloud.net
DNS.4 = mqtt.my-iot-cloud.net
The config basically contains the necessary certificate properties such as entity name, entities country code and the common name. In this case we take the domain name as the common name.
Other parameters control how OpenSSL generates the certificate:
prompt: OpenSSL does not prompt the user, it takes the information from this file (otherwise OpenSSL asks you interactively, this is not desired for automated tasks)default_md: (md = message digest), defines desired hash function for the signaturedistinguished_name: distinguished name, our C, O and CNreq_extensions: the extensions we’d like to be included in the CSR
Check CSR
Look into CSR, it contains all information we provided:
openssl req -in mqtt-server-1/csr/mqtt-server.csr.pem -noout -text
Background Info on SANs
Subject Alternative Names (SANs) define the hostnames or IP addresses a TLS certificate is valid for. Modern TLS clients no longer use the Common Name (CN) for hostname verification – instead, they require SANs as mandated by RFC 6125, which specifies that identity verification must be performed against the subjectAltName extension. Certificates without SANs are therefore rejected by current TLS implementations.
4.3 Sign the MQTT server (ThingsBoard) certificate with the Intermediate CA (server certificate / ThingsBoard)
Signing the server certificate with the Intermediate CA key and providing certificate usage constraints through a config file:
openssl x509 -req \
  -in mqtt-server-1/csr/mqtt-server.csr.pem \
  -CA server-ca/certs/server-ca.cert.pem \
  -CAkey server-ca/private/server-ca.key.pem \
  -CAcreateserial \
  -out mqtt-server-1/certs/mqtt-server.cert.pem \
  -days 365 \
  -sha256 \
  -extfile server-ca/signcsr.conf
With server-ca/signcsr.conf containing the following configuration:
basicConstraints = CA:FALSE
keyUsage = critical, digitalSignature
extendedKeyUsage = serverAuth
subjectAltName = @alt_names

[ alt_names ]
DNS.1 = my-iot-cloud.com
DNS.2 = mqtt.my-iot-cloud.com
DNS.3 = my-iot-cloud.net
DNS.4 = mqtt.my-iot-cloud.net
- Generally these server certificates expire approx. every one to two years
- Can be rotated (renewed) without touching devices
Certificate constraints
Again, we defined constraints for the certificate we are signing. This time the Intermediate CA defines the limitations for the server certificate’s future use.
Basic constraints
CA is set to false, as this certificate is not allowed to act as a CA (and is not allowed to sign other certificates)
Key Usage & Extended Key Usage
critical: the certificate explicitly instructs TLS clients to reject the certificate if they do not understand or enforce this restrictiondigitalSignature: specifies that the key may be used only for creating and verifying digital signatures (<- required for our MQTT server)serverAuth: server is allowed to provide its identity using this certificate
Subject Alternative Names (SAN)
In case you are wondering why we provide the SANs here again – even though they were already provided when creating the CSR – has a simple reason: These are stored as extensions in the certificate signing request and per default, OpenSSL is not copying extensions when signing a certificate (it just ignores them). Instead, they have to be provided again at signing time. This is what we do here.
On macOS (which uses LibreSSL instead of OpenSSL), certificate extensions from CSRs are not copied automatically, which is why SANs are explicitly provided again at signing time. OpenSSL offers a parameter -copy_extensions copy which allows to copy these extensions – but to stay compliant with macOS’s native LibreSSL, we don’t take his path here.
Check
Look into certificate:
openssl x509 -in mqtt-server-1/certs/mqtt-server.cert.pem -noout -text
Check SANs:
openssl x509 -in mqtt-server-1/certs/mqtt-server.cert.pem -noout -text | \
    grep -A1 "Subject Alternative Name"
The command shows the certificate as human-readable text containing all necessary information. The second command intentionally filters (with grep) for the SANs.
5. Prepare chain for MQTT Server (ThingsBoard)
The MQTT server (ThingsBoard) requires the following files to work:
- Server certificate:
mqtt-server-1/certs/mqtt-server.cert.pem - Server private key:
mqtt-server-1/private/mqtt-server.key.pem - Chain file (consists of server certificate and intermediate CA certificate):
mqtt-server-1/mqtt-server.chain.pem
cat mqtt-server-1/certs/mqtt-server.cert.pem \
    server-ca/certs/server-ca.cert.pem \
    > mqtt-server-1/mqtt-server.chain.pem
Concatenation order matters! When configuring the server-side TLS chain, certificate order is important: The server must present its leaf certificate first, followed by intermediate CAs, allowing clients to build a valid trust chain to a pinned root.
Look into certificate chain:
while openssl x509 -noout -text; do :; done < mqtt-server-1/mqtt-server.chain.pem
Just focus on certificate info and issuer (to get a fast overview of the chain itself):
while openssl x509 -noout -text; do :; done < mqtt-server-1/mqtt-server.chain.pem | grep -A13 "Certificate:"
RFC 5246 states that a server has to present the server certificate and the intermediate certificates to the clients:
If the server is authenticated, its certificate message must provide a valid certificate chain leading to an acceptable certificate authority.
Therefore, we add both (server cert & intermediate CA certificate) to our certificate chain which will be presented by the MQTT server (ThingsBoard) to the clients.
The clients will accept the server certificate as the chain additionally includes the Intermediate CA which is signed by the Root CA. The Root CA is known (and trusted) by the client as it is “baked” into the client as part of its software / firmware contained in the ca-bundle.pem file (created in section 5).
5.1 Sanity check
Check your server chain locally, to make sure it will work for the clients later:
openssl verify \
  -CAfile ca-bundle.pem \
  -untrusted server-ca/certs/server-ca.cert.pem \
  mqtt-server-1/mqtt-server.chain.pem
Should show: mqtt-server-1/mqtt-server.chain.pem: OK
6.2 provides some details about how OpenSSL handles the verification and why -untrusted is used in this context.
6. Create CA bundle for device-side pinning
Create a ca-bundle for integration into client device (device-side CA pinning). This will be shipped with the client devices, integrated in software or firmware and tells the client to trust all servers presenting certificates signed by this CA.
cat root-ca/certs/root-ca.cert.pem \
    > ca-bundle.pem
Here, we take only the Root CA certificate to generate our ca-bundle.pem for the client devices to verify the server identity. This allows to easily rotate the intermediate and server certificate.
Look into certificate bundle:
openssl x509 -in ca-bundle.pem -noout -text
6.1 Optional (not recommended): Include intermediate CA -> more restrictive
When going more restrictive, one could add the intermediate CA into the ca-bundle for the client devices. This makes rotation (renewal) more complex, because the devices check the server identity by looking at the Root CA and the Intermediate CA.
This means: if you rotate (= change / renew) the Intermediate CA you have to provide a new ca-bundle to the client devices at the same time to prevent a certificate mismatch error which is going to prevent your clients from establishing a connection to the server.
This is how the ca-bundle would look like if we added the Intermediate CA:
cat server-ca/certs/server-ca.cert.pem \
    root-ca/certs/root-ca.cert.pem \
    > ca-bundle.pem
Look into certificate bundle chain:
while openssl x509 -noout -text; do :; done < ca-bundle.pem
This applies the openssl command to all certificates inside the ca-bundle.
6.2 Sanity check
Check if the ca-bundle for the client devices matches the MQTT server (ThingsBoard) certificate:
openssl verify \
  -CAfile ca-bundle.pem \
  -untrusted server-ca/certs/server-ca.cert.pem \
  mqtt-server-1/certs/mqtt-server.cert.pem
Should show: mqtt-server-1/certs/mqtt-server.cert.pem: OK
This is basically the same check the client devices will do during establishing a secure connection to the MQTT server. The -CAfile is the ca-bundle known and trusted by the client device (integrated in its software/firmware) and mqtt-server-1/certs/mqtt-server.cert.pem is the server certificate presented by the MQTT server (ThingsBoard) to the client device.
Instead of providing the certificate chain file mqtt-server-1/mqtt-server.chain.pem (containing the intermediate CA) to openssl, we directly reference the intermediate CA certificate using the -untrusted server-ca/certs/server-ca.cert.pem flag.
Openssl basically treats a self-signed certificate (certificate which is its own issuer) as Root CA and trusts this. The intermediate CA certificate is not a Root CA and therefore has to be provided through -untrusted to be taken into account for checking. If the chain consists of several intermediate certificates, each intermediate certificate can be provided via -untrusted.
7. What goes where
The following files will be rolled out to either server or client side.
| File | Purpose | Location |
|---|---|---|
mqtt-server.key.pem | Server private key (keep secret) | MQTT Server (ThingsBoard) and (secure) backup, at a safe place (nowhere else) |
mqtt-server.cert.pem | Server certificate | MQTT Server (ThingsBoard) and backup |
mqtt-server.chain.pem | Server certificate chain | MQTT Server (ThingsBoard) and backup |
ca-bundle.pem | Bundle for client device CA pinning | Client device as part of firmware / software |
The following files will never be rolled out and have to be kept at a safe place (offline) at all times!
| File | Purpose | Location |
|---|---|---|
root-ca.key.pem | Root CA private key | Offline / encrypted storage / safe place |
server-ca.key.pem | Intermediate server CA private key | Offline / encrypted storage / safe place |
8. OpenSSL command parameters explanation
All the steps we have carried out use OpenSSL, which is available by default on Linux, macOS, and other Unix-based systems. Below is a brief explanation of the most commonly used parameters:
openssl ecparam: invokes OpenSSL’s elliptic curve parameter and key generation toolopenssl genrsa: invokes OpenSSL’s RSA key generation tool-name secp256r1: selects the elliptic curve to use, secp256r1 is also known as P-256, a widely supported standard curve (referenced in ThingsBoard official documentation)-genkey: generates a new private key based on the specified elliptic curve-CAcreateserial: creates a serial number file for the CA if it does not yet exist, ensuring unique serial numbers for issued certificatesopenssl req: invokes OpenSSL’s certificate request generation tool-x509: generates a self-signed certificate instead of a CSR-new: indicates that we are creating a new certificate request / certificate-nodes: “no DES”, telling OpenSSL that the private key is not encrypted with a passphrase and that it should not ask for one (disabling interactive prompts)-key root-ca/private/root-ca.key.pem: the private key to use for signing the certificate-sha256: use SHA-256 hash for the certificate signature-days 365: defines the validity period of the certificate in days (here: one year until expiry)-out root-ca/certs/root-ca.cert.pem: output file for the resulting Root CA certificate in PEM format-subj "/C=DE/O=my IoT Cloud Company/OU=PKI/CN=IoT Cloud Root CA": providing the Distinguished Name (DN) fields directly, to disable interactive promptsopenssl x509: invokes OpenSSL’s certificate management tool, used for displaying, signing, or converting X.509 certificates-in server-ca/certs/server-ca.cert.pem: the input certificate file to be shown (here, the server certificate)-noout: suppresses the raw PEM output (this is just a base64 encoded string)-text: shows the certificate as human-readable-extfile server-ca/signcsr.conf: points to a configuration file containing certificate extensions (such as SANs, key usage, etc.)
After generating the key, I used chmod 400 path/to/key.pem to (slightly) improve security by ensuring that only my user account can read the private key file.
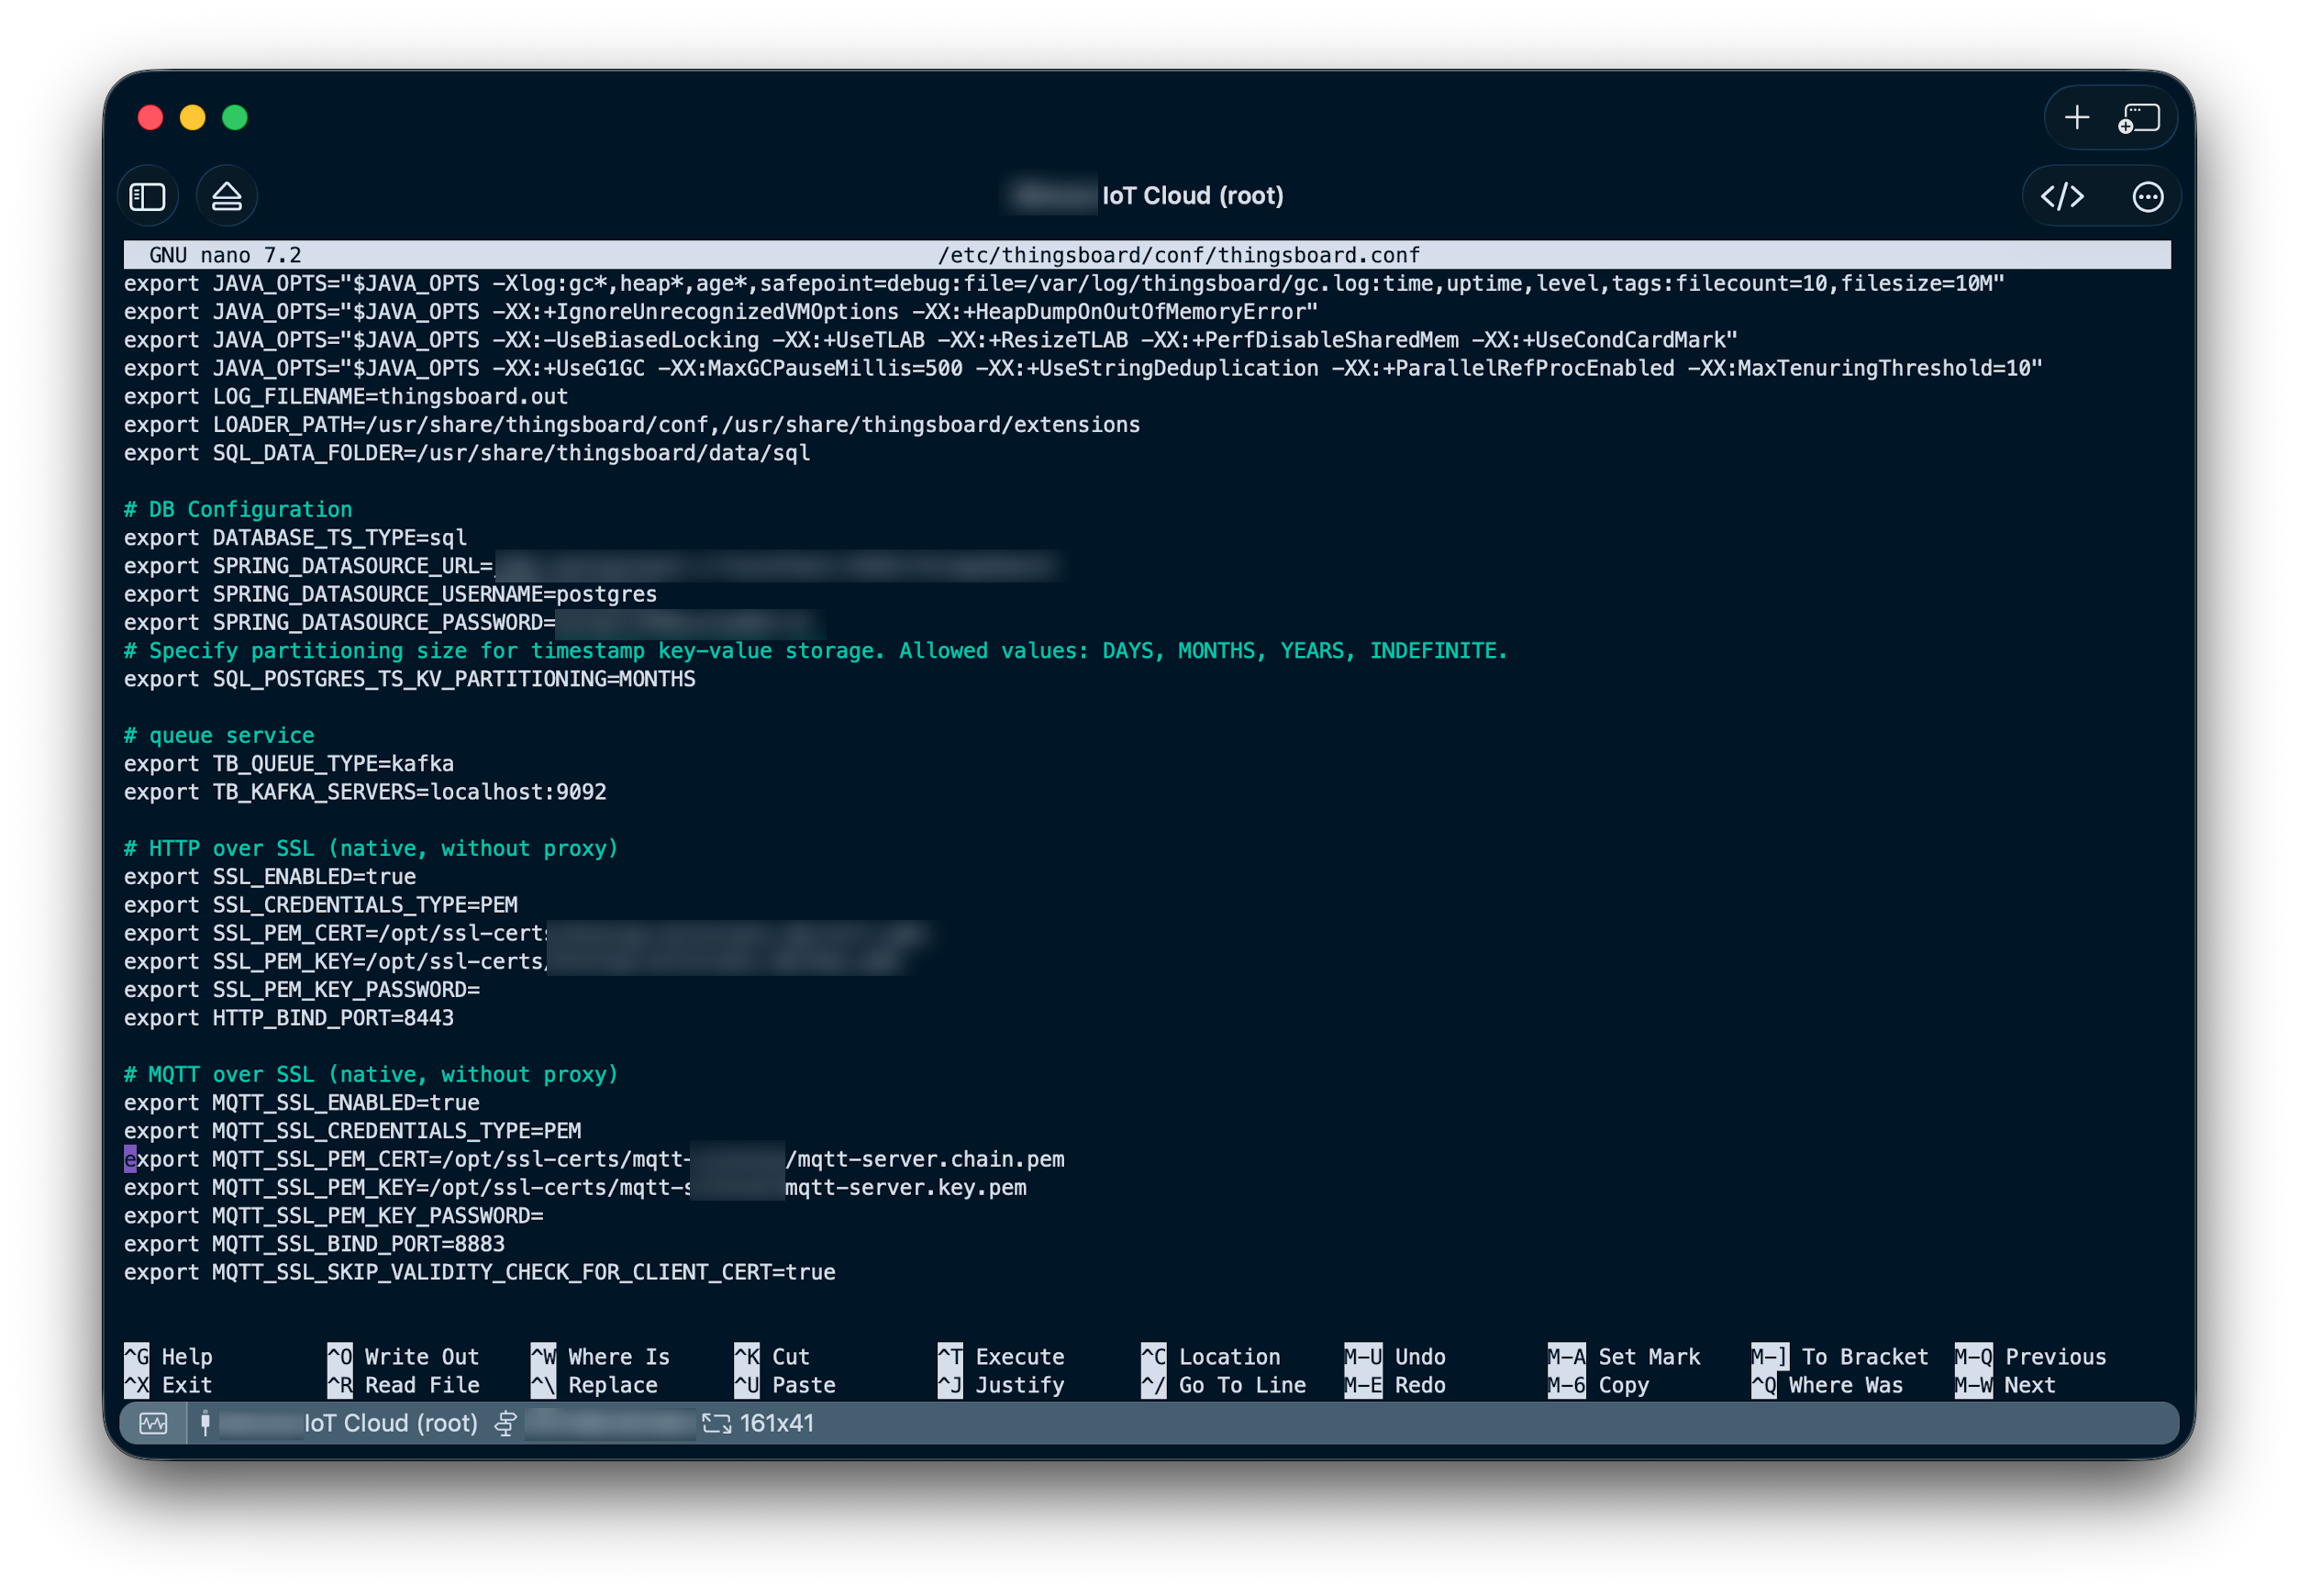
9. ThingsBoard MQTT configuration
The ThingsBoard configuration is located in /etc/thingsboard/conf/thingsboard.conf. Under the section MQTT Over SSL (native, without proxy) you can set up the MQTT/TLS configuration:
export MQTT_SSL_ENABLED=true
export MQTT_SSL_CREDENTIALS_TYPE=PEM
export MQTT_SSL_PEM_CERT=/opt/ssl-certs/mqtt/mqtt-server.chain.pem
export MQTT_SSL_PEM_KEY=/opt/ssl-certs/mqtt/mqtt-server.key-pem
export MQTT_SSL_PEM_KEY_PASSWORD=
export MQTT_SSL_BIND_PORT=8883
export MQTT_SSL_SKIP_VALIDITY_CHECK_FOR_CLIENT_CERT=true
The first four lines are the most important ones:
- Enable TLS over MQTT
- Certificate type is PEM (as we created the certificates and chains earlier)
- Here you normally provide the server certificate; for ThingsBoard: this can be the server certificate chain as well (we do this, as there is no other configuration option where the certificate chain could be configured)
- Here you provide the servers private key
- n.a., as we did not password-protect the key file
- 8883 is the standard port for MQTT-over-SSL
- n.a. as we don’t do client authentication using certificates
Restart your ThingsBoard service or reboot the server: sudo systemctl restart thingsboard.service
10. Alternative: RSA key for the MQTT Server
In some rare cases – especially when dealing with older client TLS stacks – there is the chance that these clients are unable to work with EC based server certificates. In this case you can create an RSA key for the server and sign it with your intermediate CA.
It does not matter that the Intermediate (and Root) CA keys are based on EC. The chain of trust is based on signatures and not on using the same cryptographic algorithm throughout the entire PKI.
10.1. Creating an RSA key for the MQTT Server
This now can be seen as just another/new key pair for another server, therefore we create a new subfolder in our ecpki tree:
mkdir -p mqtt-server-2/certs
mkdir mqtt-server-2/private
mkdir mqtt-server-2/csr
And create a new RSA based key with a 2048 bit key size:
openssl genrsa -out mqtt-server-2/private/mqtt-server.key.pem 2048
chmod 400 mqtt-server-2/private/mqtt-server.key.pem
You can basically continued with 4.2 MQTT Server (ThingsBoard) CSR, just make sure not to get mixed up with the other key generated for mqtt-server-1.
In addition, there is one important point when it comes to the certificate signing procedure. As we now have an RSA certificate, we need to add a configuration argument to our intermediate CA signing configuration.
Copy the current config and save it under a new config file: cp server-ca/signcsr.conf server-ca/signcsr-rsa.conf
And add keyEncipherment to keyUsage, as shown here:
basicConstraints = CA:FALSE
keyUsage = critical, digitalSignature, keyEncipherment
extendedKeyUsage = serverAuth
subjectAltName = @alt_names

[ alt_names ]
DNS.1 = my-iot-cloud.com
DNS.2 = mqtt.my-iot-cloud.com
DNS.3 = my-iot-cloud.net
DNS.4 = mqtt.my-iot-cloud.com
11. TLS 1.2 vs TLS 1.3
This is important as RSA key exchange requires keyEncipherment and is especially the case for TLS versions 1.2 (and earlier). As TLS versions 1.3 do not use RSA for key exchange (only for signatures) keyEncipherment is irrelevant. Anyhow, omitting it will make no differences when all clients support TLS 1.3, but it won’t work with clients still using TLS 1.2.
This has to do with a major advantage in TLS 1.3: No RSA key transport happens in TLS 1.3. In TLS 1.2, the client encrypted a secret with the server’s RSA key to perform the key exchange. In TLS 1.3, that mechanism was discontinued because a stolen server private key could decrypt past traffic. This ensures Perfect Forward Secrecy (PFS) for TLS 1.3.
12. Handling Private Keys Without a Passphrase
In this guide, we generated the private keys without a passphrase to support fully automated deployments (even though we did not dig into the details regarding automation).
This is a common practice in industrial IoT and enterprise PKI setups, as servers and devices need to access the key on startup without manual intervention. Security is instead enforced through strict filesystem permissions (chmod 400), limiting access to only the process or user that requires it.
The Root and Intermediate CA keys remain offline and physically secured, mitigating the main risks. While encrypting private keys with a password adds a layer of protection, it complicates automation and is often unnecessary if operational security, access control, and secure backups are properly implemented.
📬 Stay in the loop?
If you’d like to stay up to date with future technical guides and project insights, subscribe to my newsletter. I share practical knowledge, lessons learned, and updates – no spam, just content for developers and engineers.