How to Set Up Ubuntu Linux as a Kiosk or Self-Service Terminal (Part 1)

Everybody knows them – from fast food restaurants to airports and train stations: self-service terminals with large touchscreens, designed for a single purpose such as ordering and paying, baggage drop-off, and many more tasks. As developers, we often think only about the software itself, but in this context we have to tackle a unique mix of challenges: ensuring intuitive usability for users, handling different input methods like touchscreens or card readers, and sometimes working within strict hardware limitations, such as using a read-only filesystem for security.
In this blog post, I’ll propose a set up which configures Ubuntu Linux 24.04 LTS as a solid base for a secure, reliable kiosk or self-service terminal.
The first part focuses on configuring the operating system to run a single app on the kiosk. To keep it simple, we’ll start with Firefox displaying a simple webpage in fullscreen mode.
In the next part, I’ll share some thoughts and ideas on building a Python Kivy app to use as the main kiosk application.
In This Post
Hardware
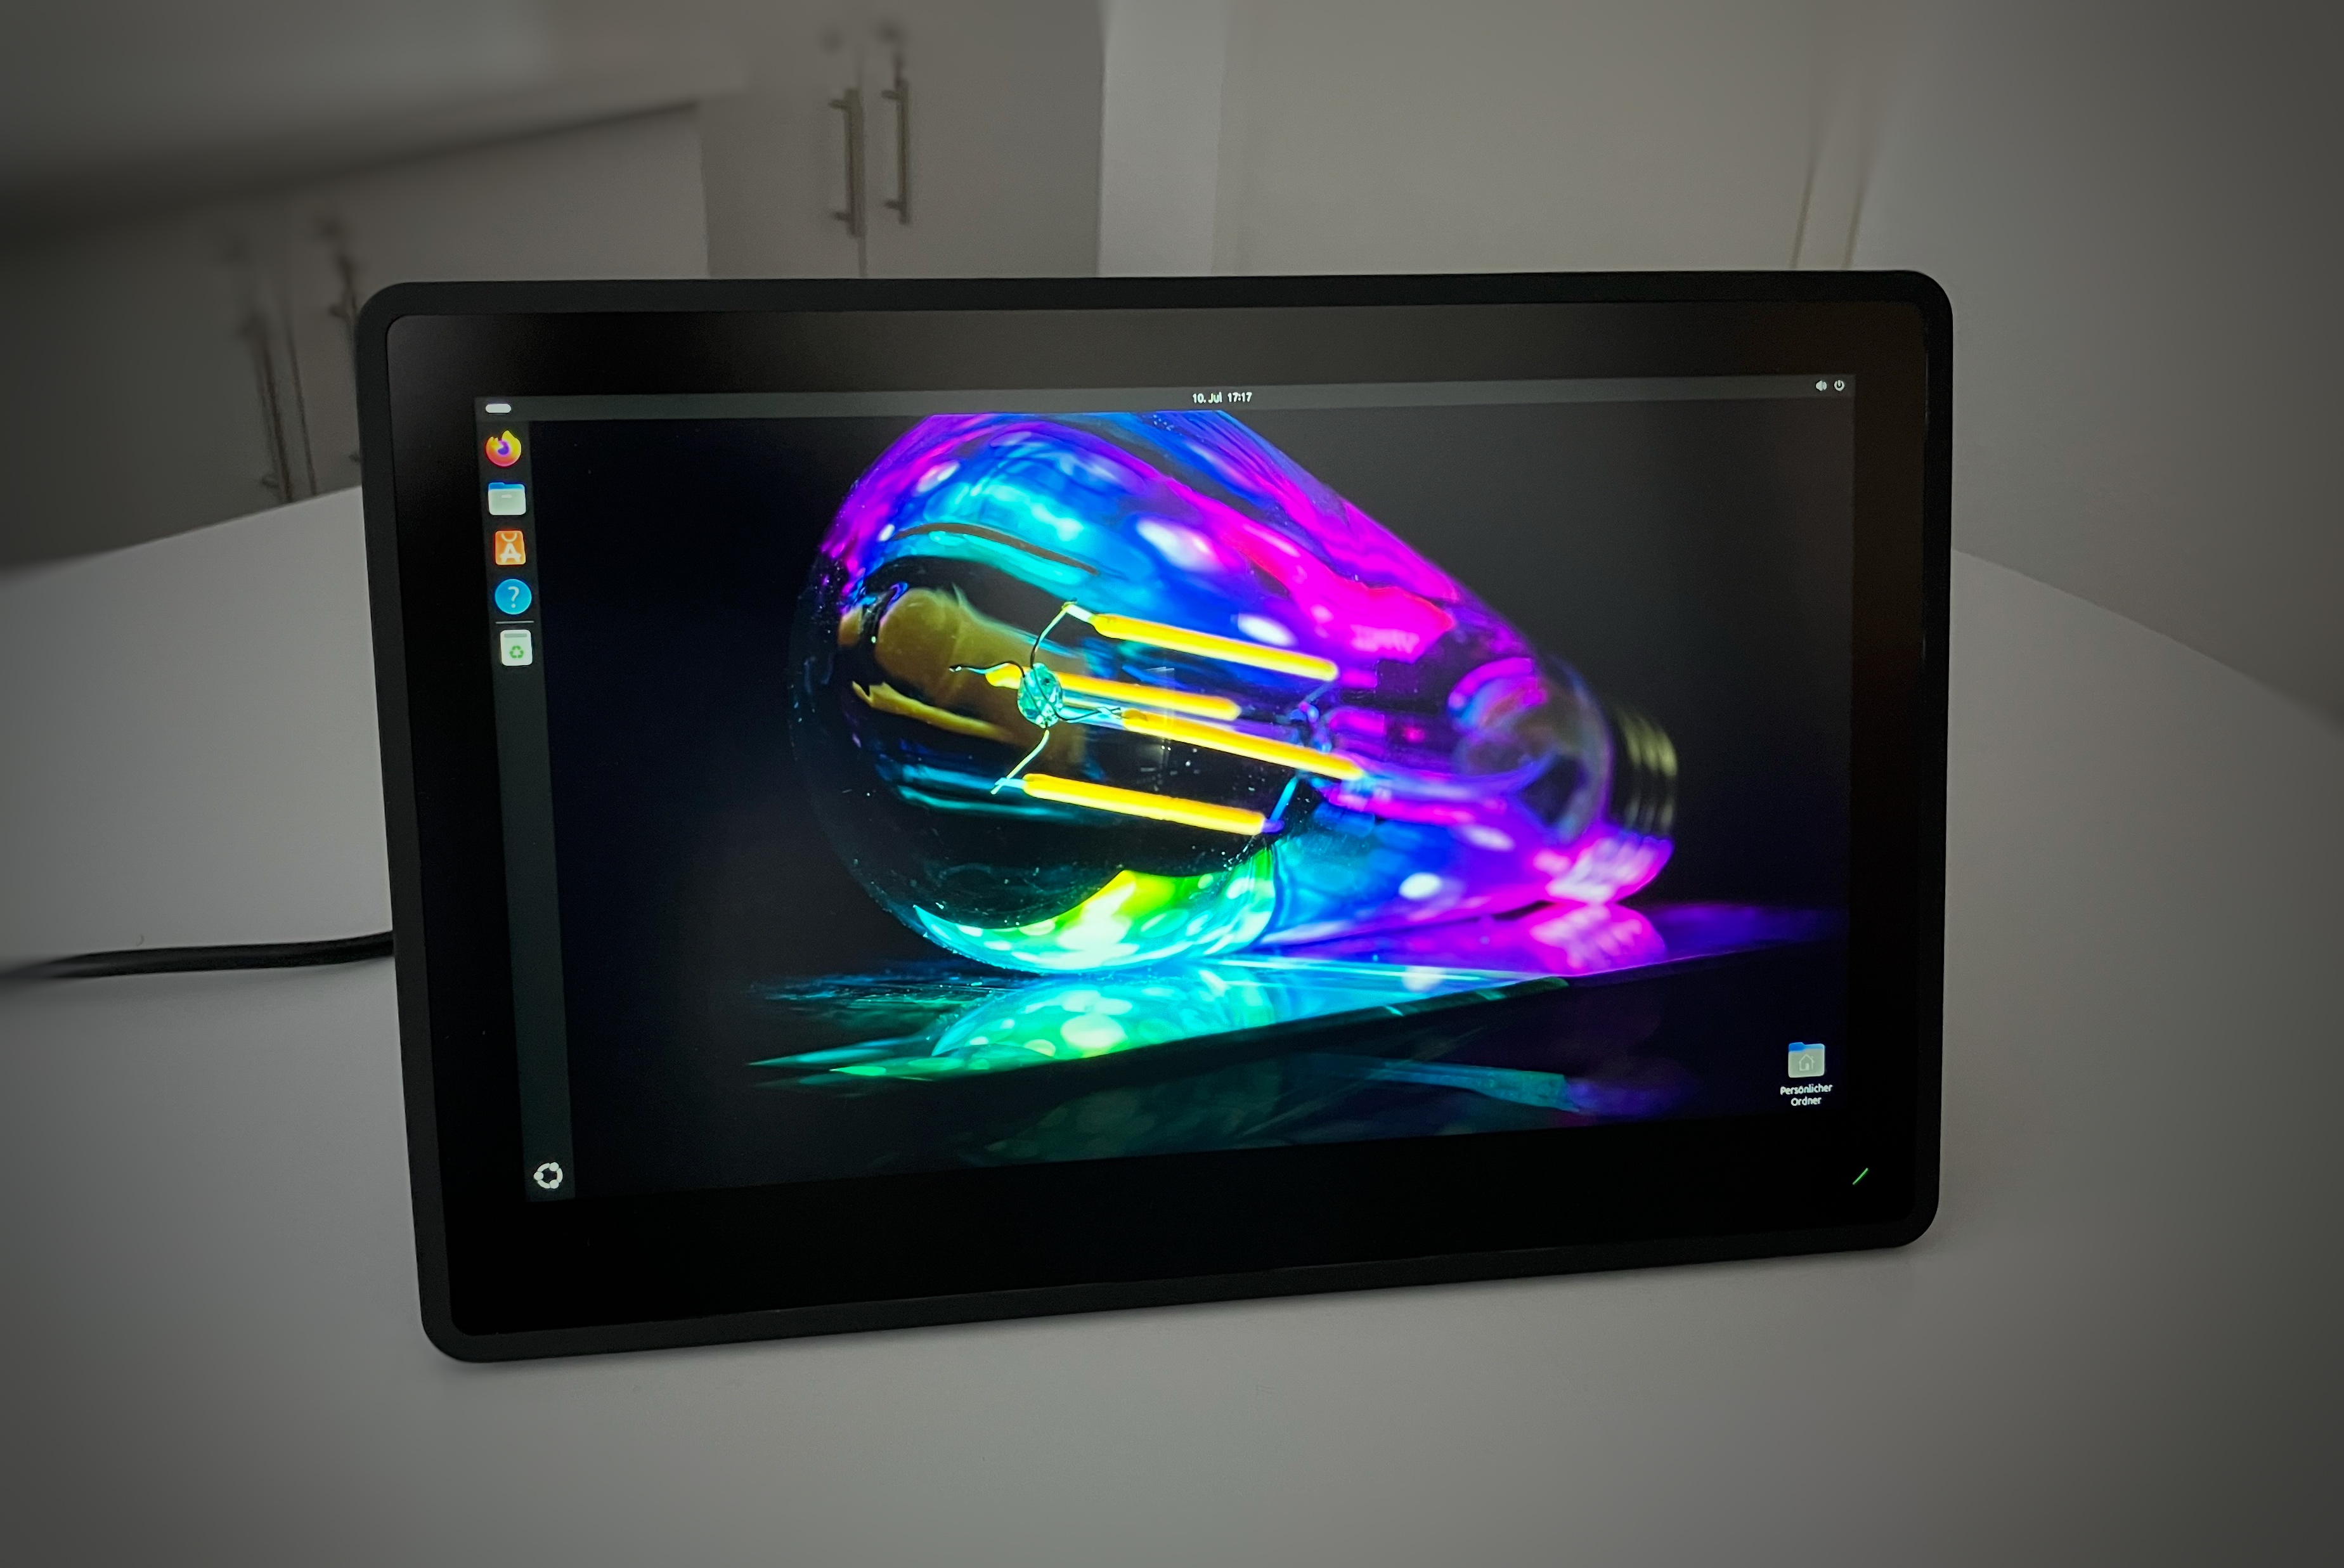
For this project, I used a PC type that’s widely available. It features an integrated touchscreen and the following hardware setup:
- 13" touchscreen
- Intel N4200 CPU
- 8 GB RAM
- 120 GB industrial-grade SSD
- Ubuntu 24.04 LTS operating system
BIOS / UEFI Settings
Depending on your hardware, you’ll want to configure "Restore AC Power Loss: Always On" to ensure that your PC boots up automatically when power is restored. Alternatively, you might want to enable Wake-on-LAN if you plan to power the system remotely. These settings are usually found in the system’s BIOS or UEFI firmware.
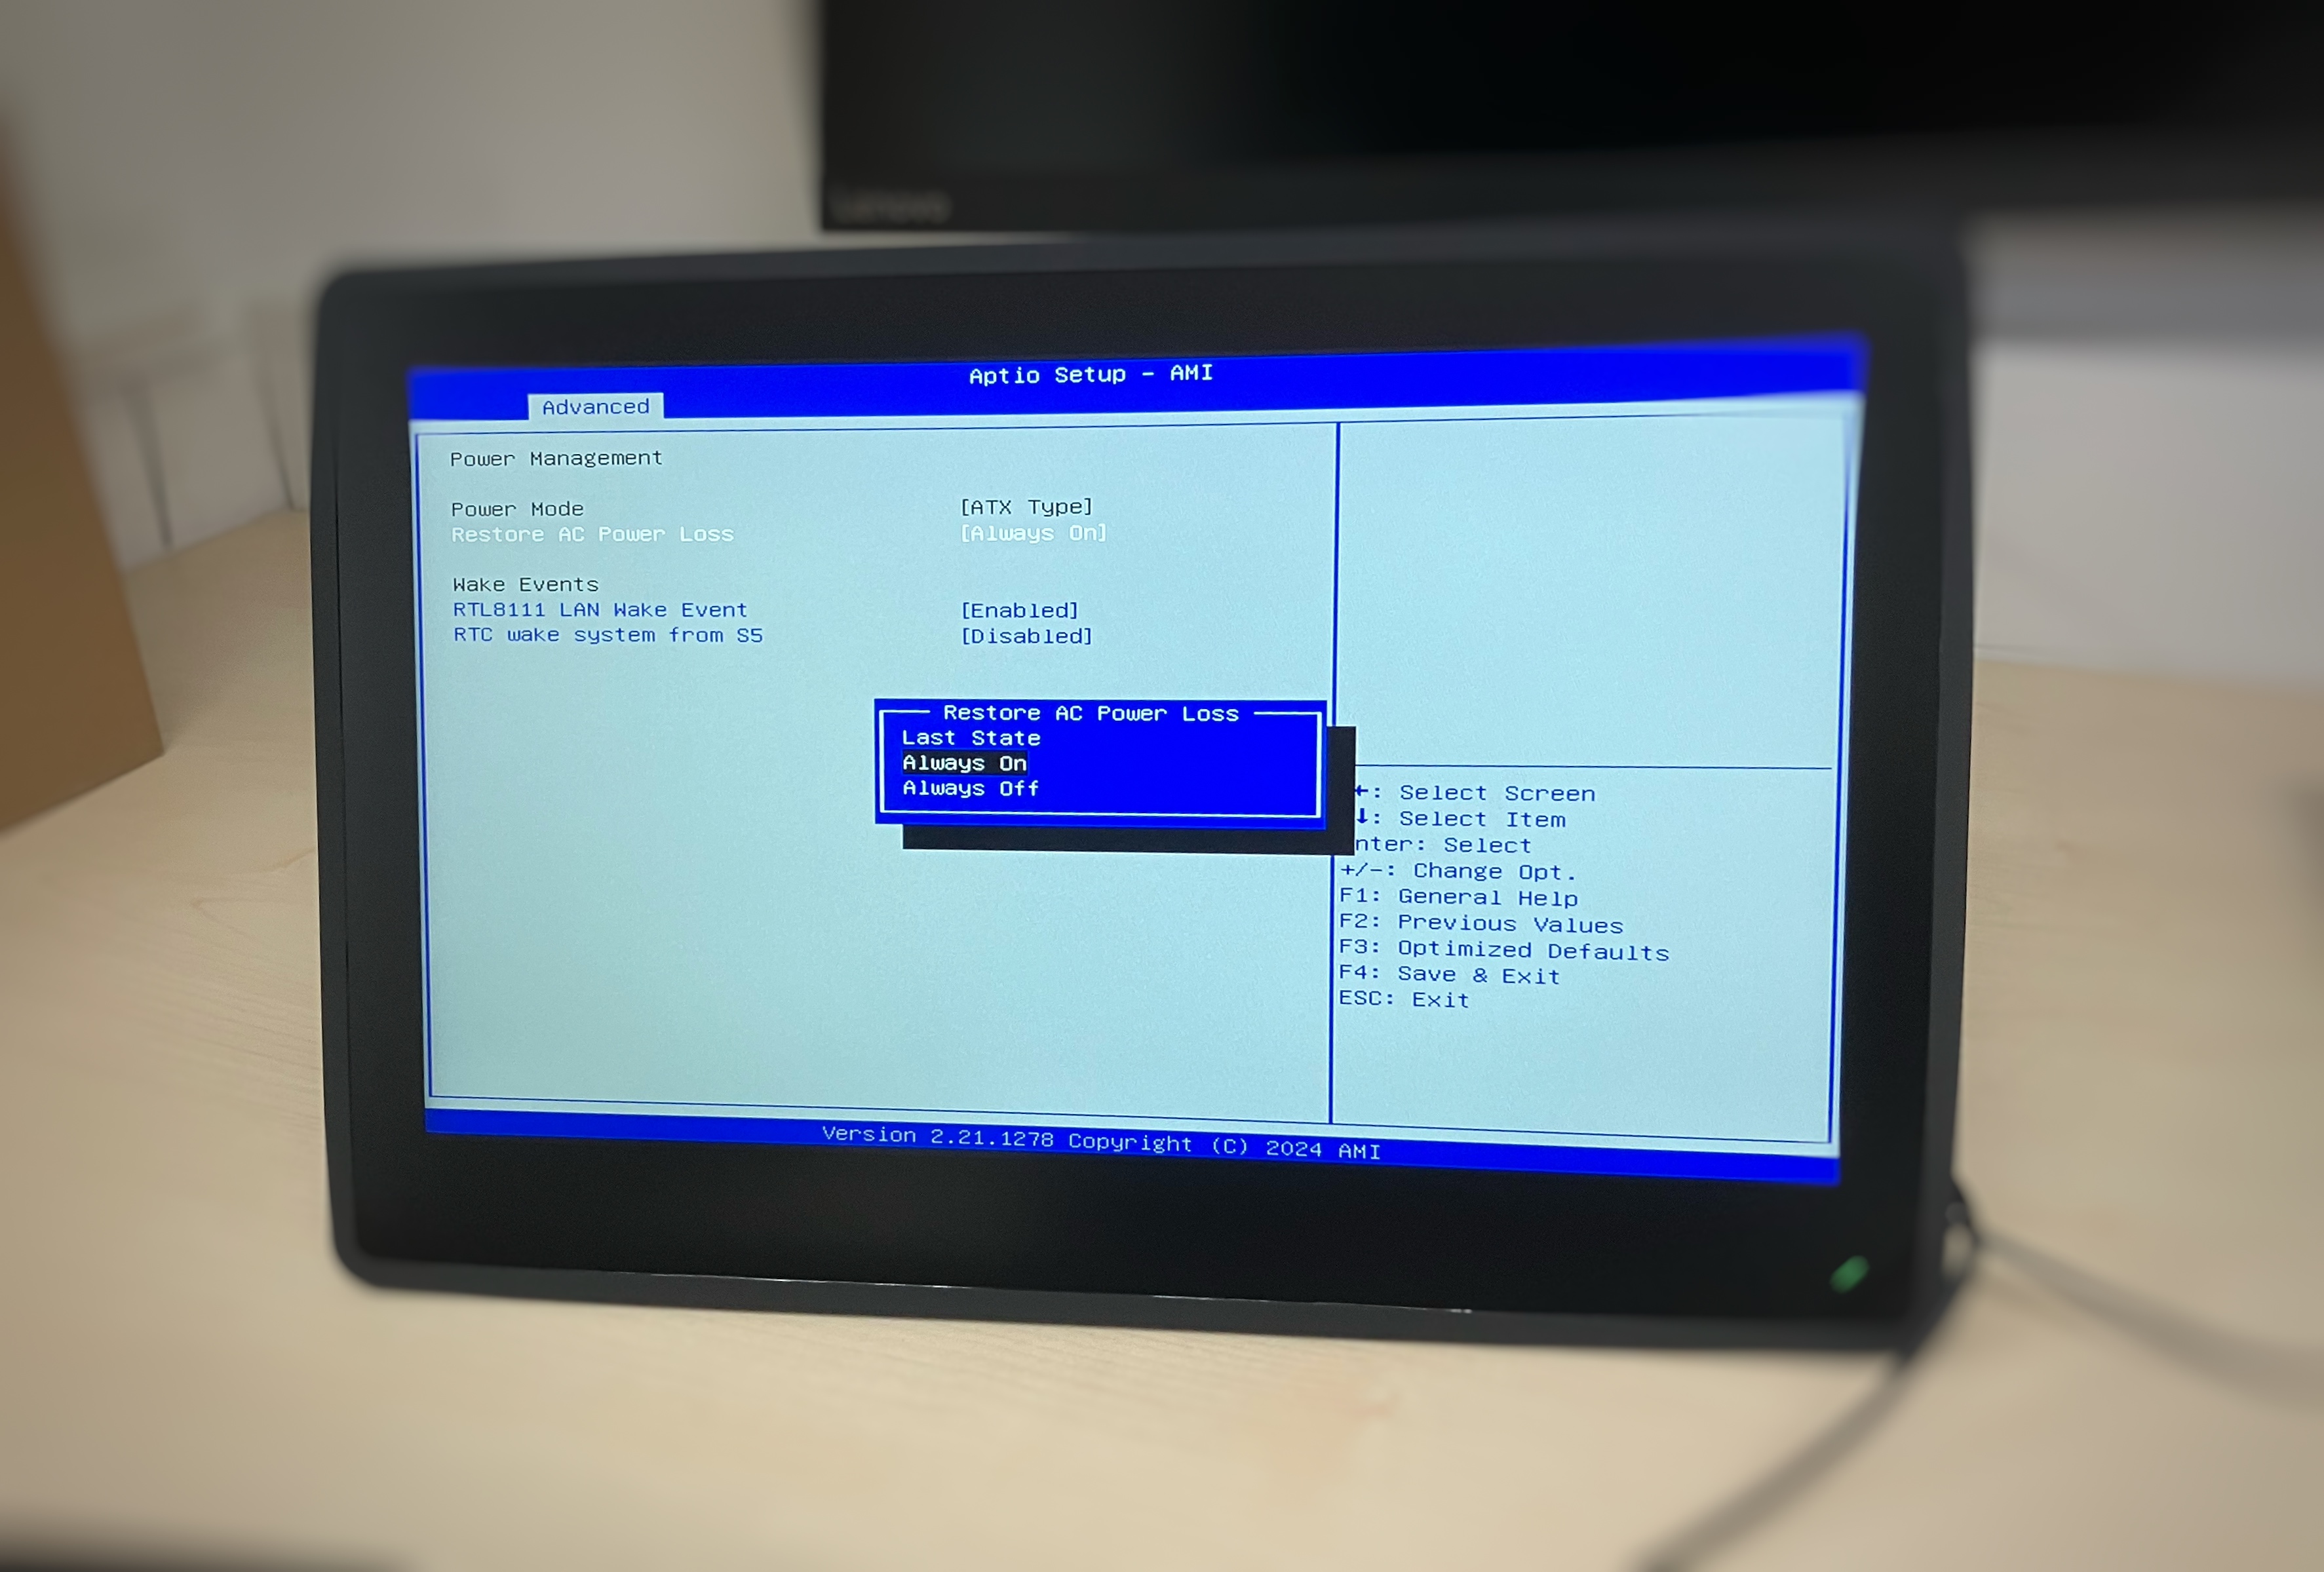
Based on the device’s intended usage location, it might be important to protect the BIOS/UEFI with a login to prevent unauthorized access or modification. This setting is located in the BIOS as well.
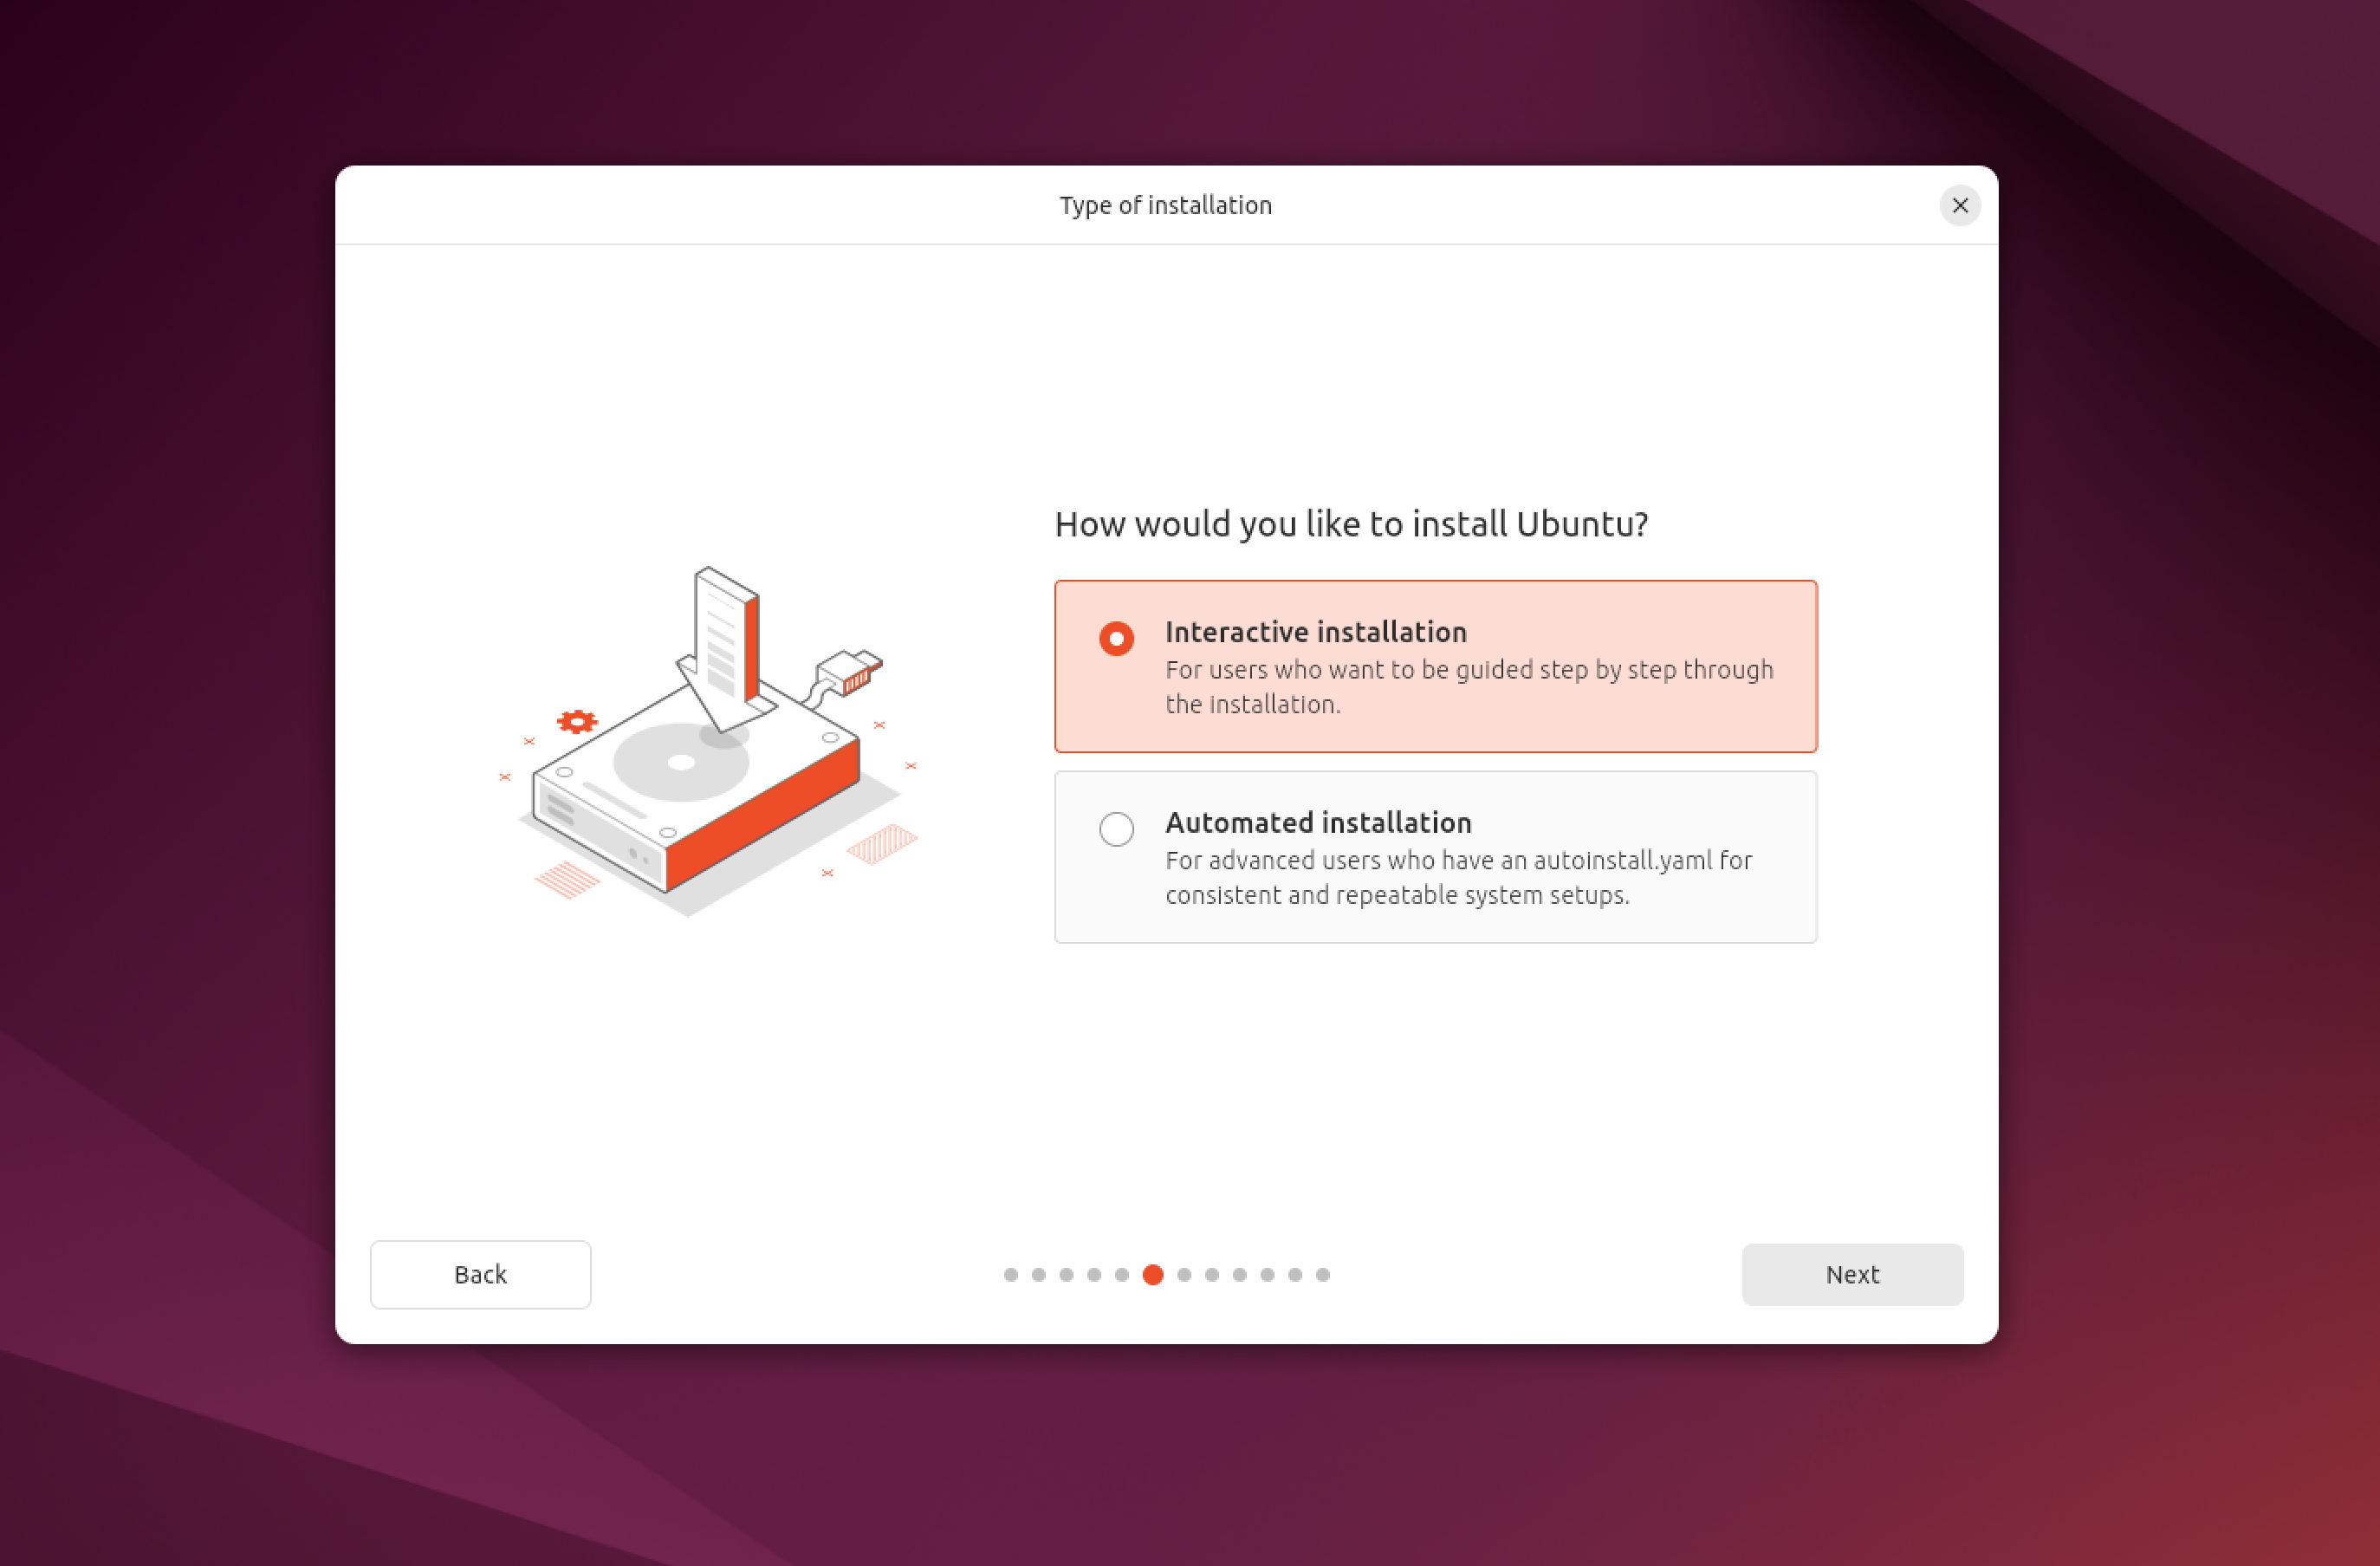
Installing Ubuntu (the manual way)
There exist several possibilities for mass deployment, but I might cover this in a separate post. Refer to the end of this post for further discussion on this topic.
I installed Ubuntu from a live ISO and went through the manual installation process. Make sure to think about the following points during installation:
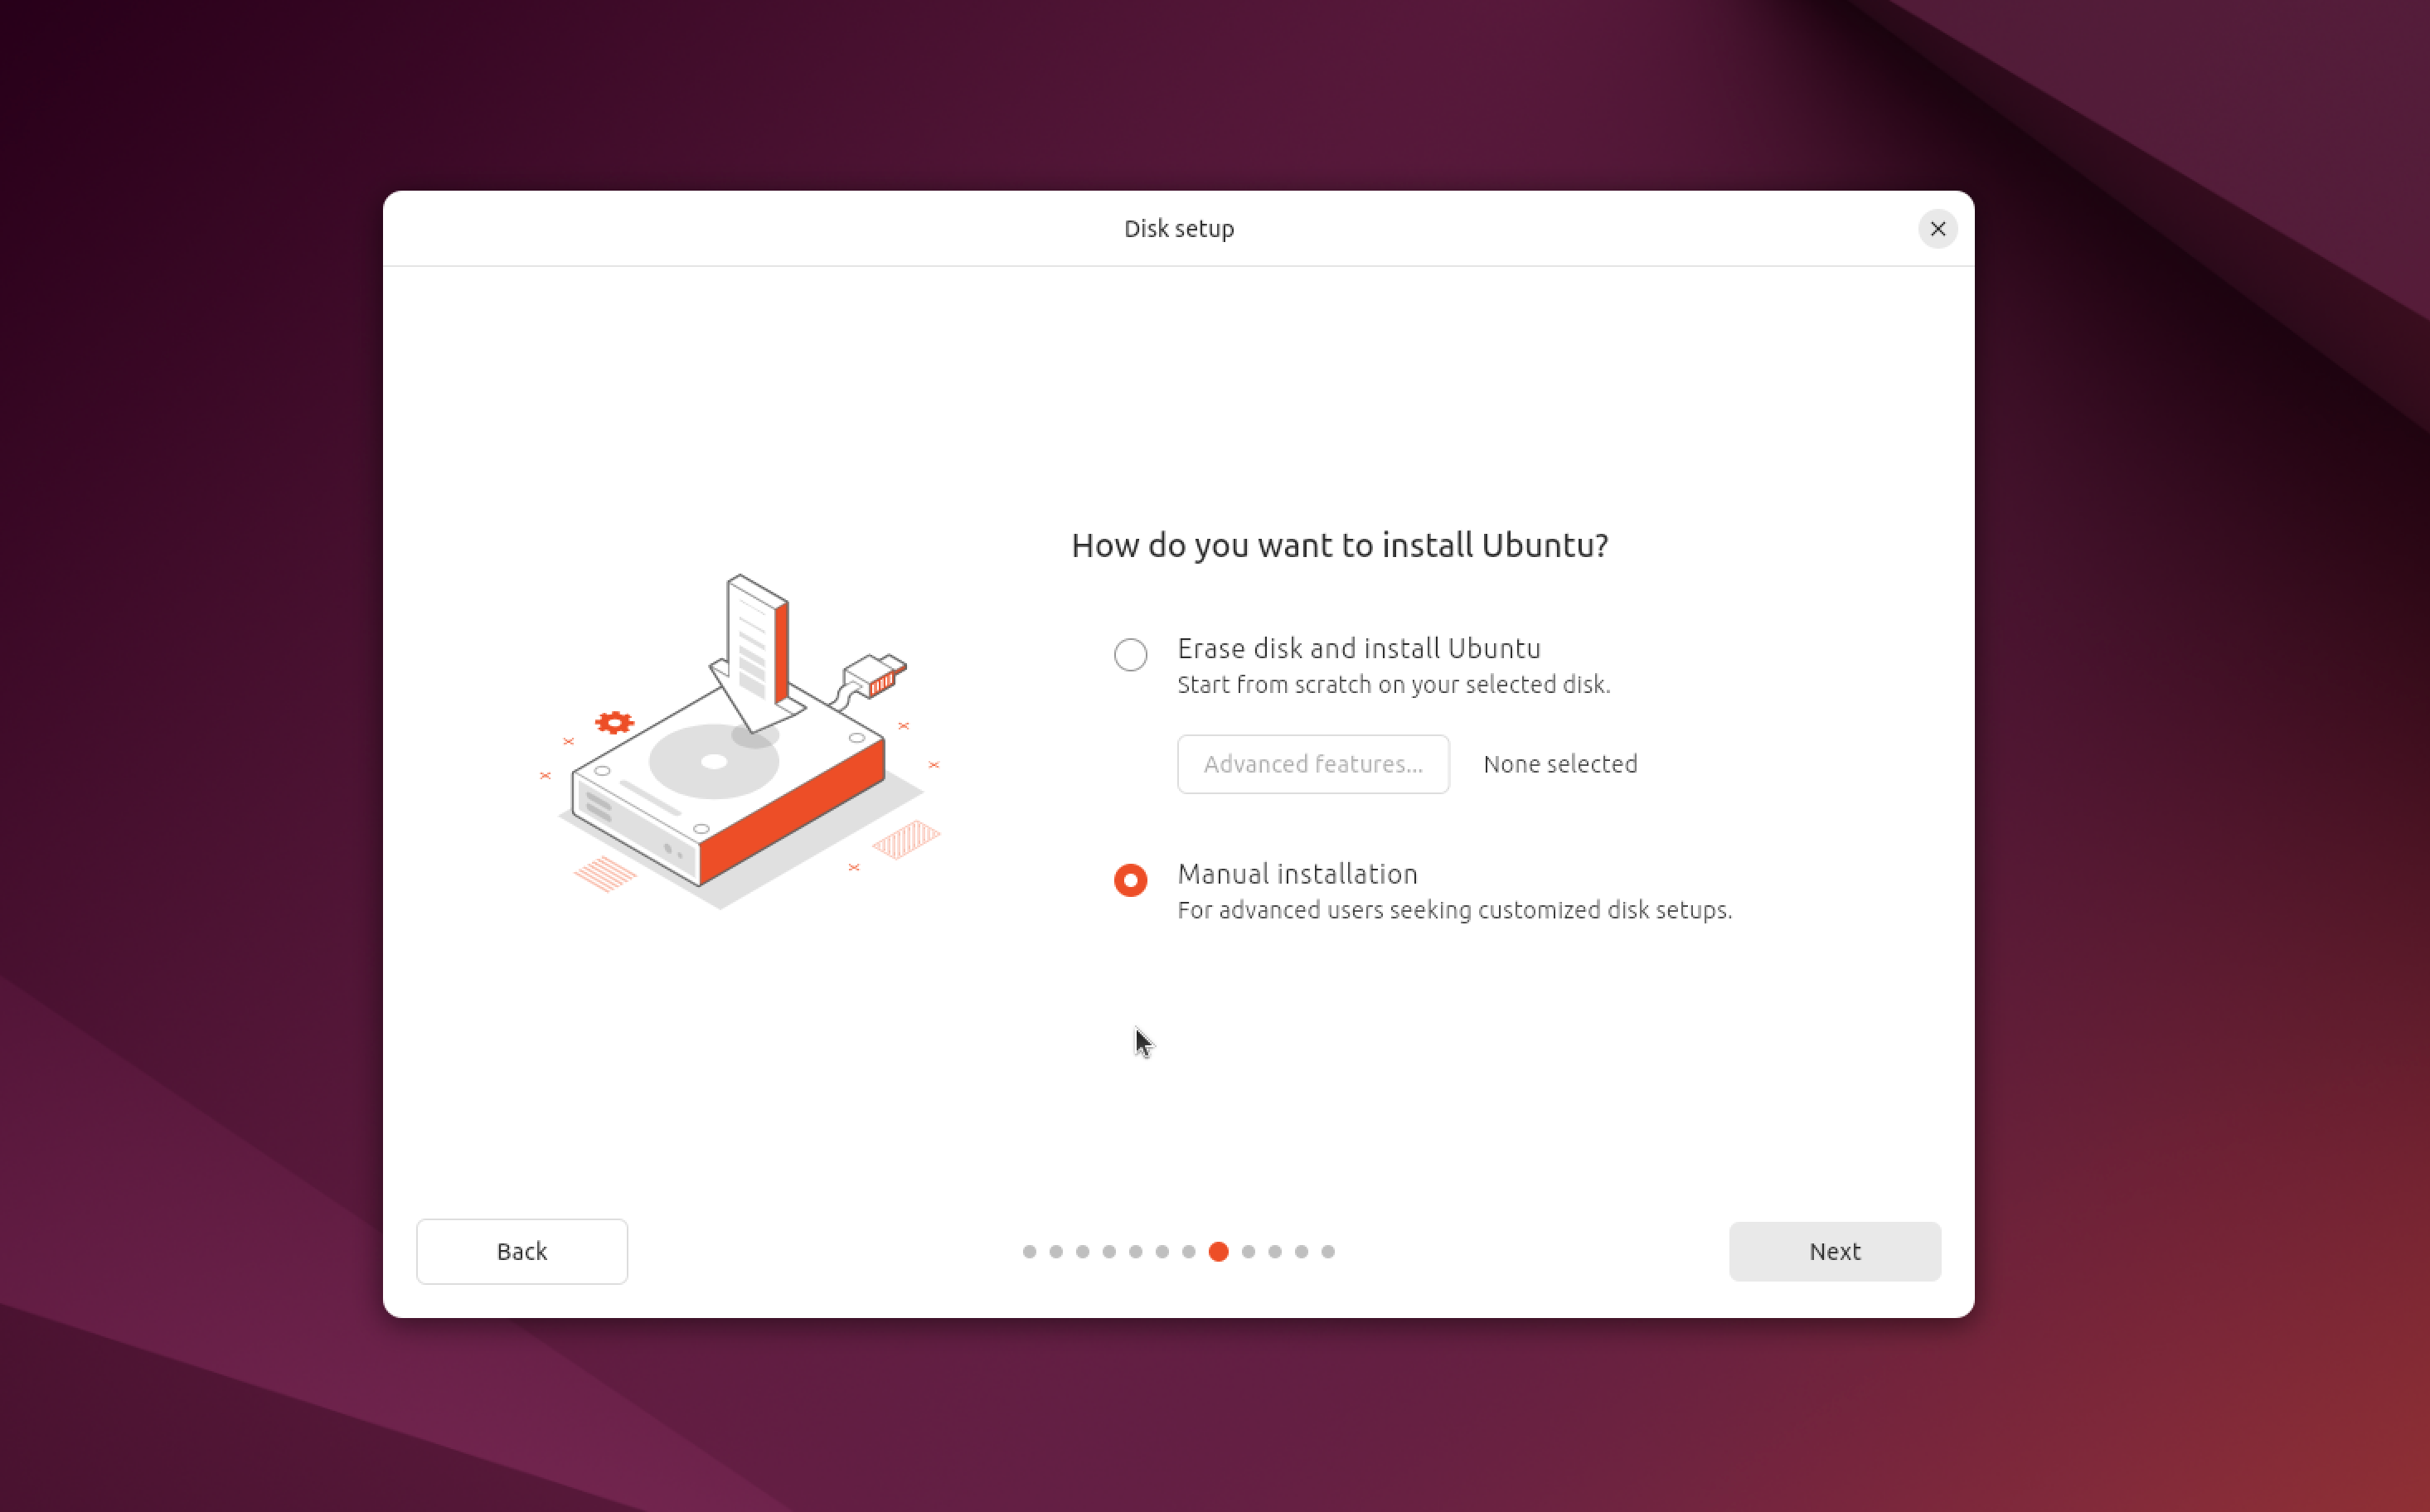
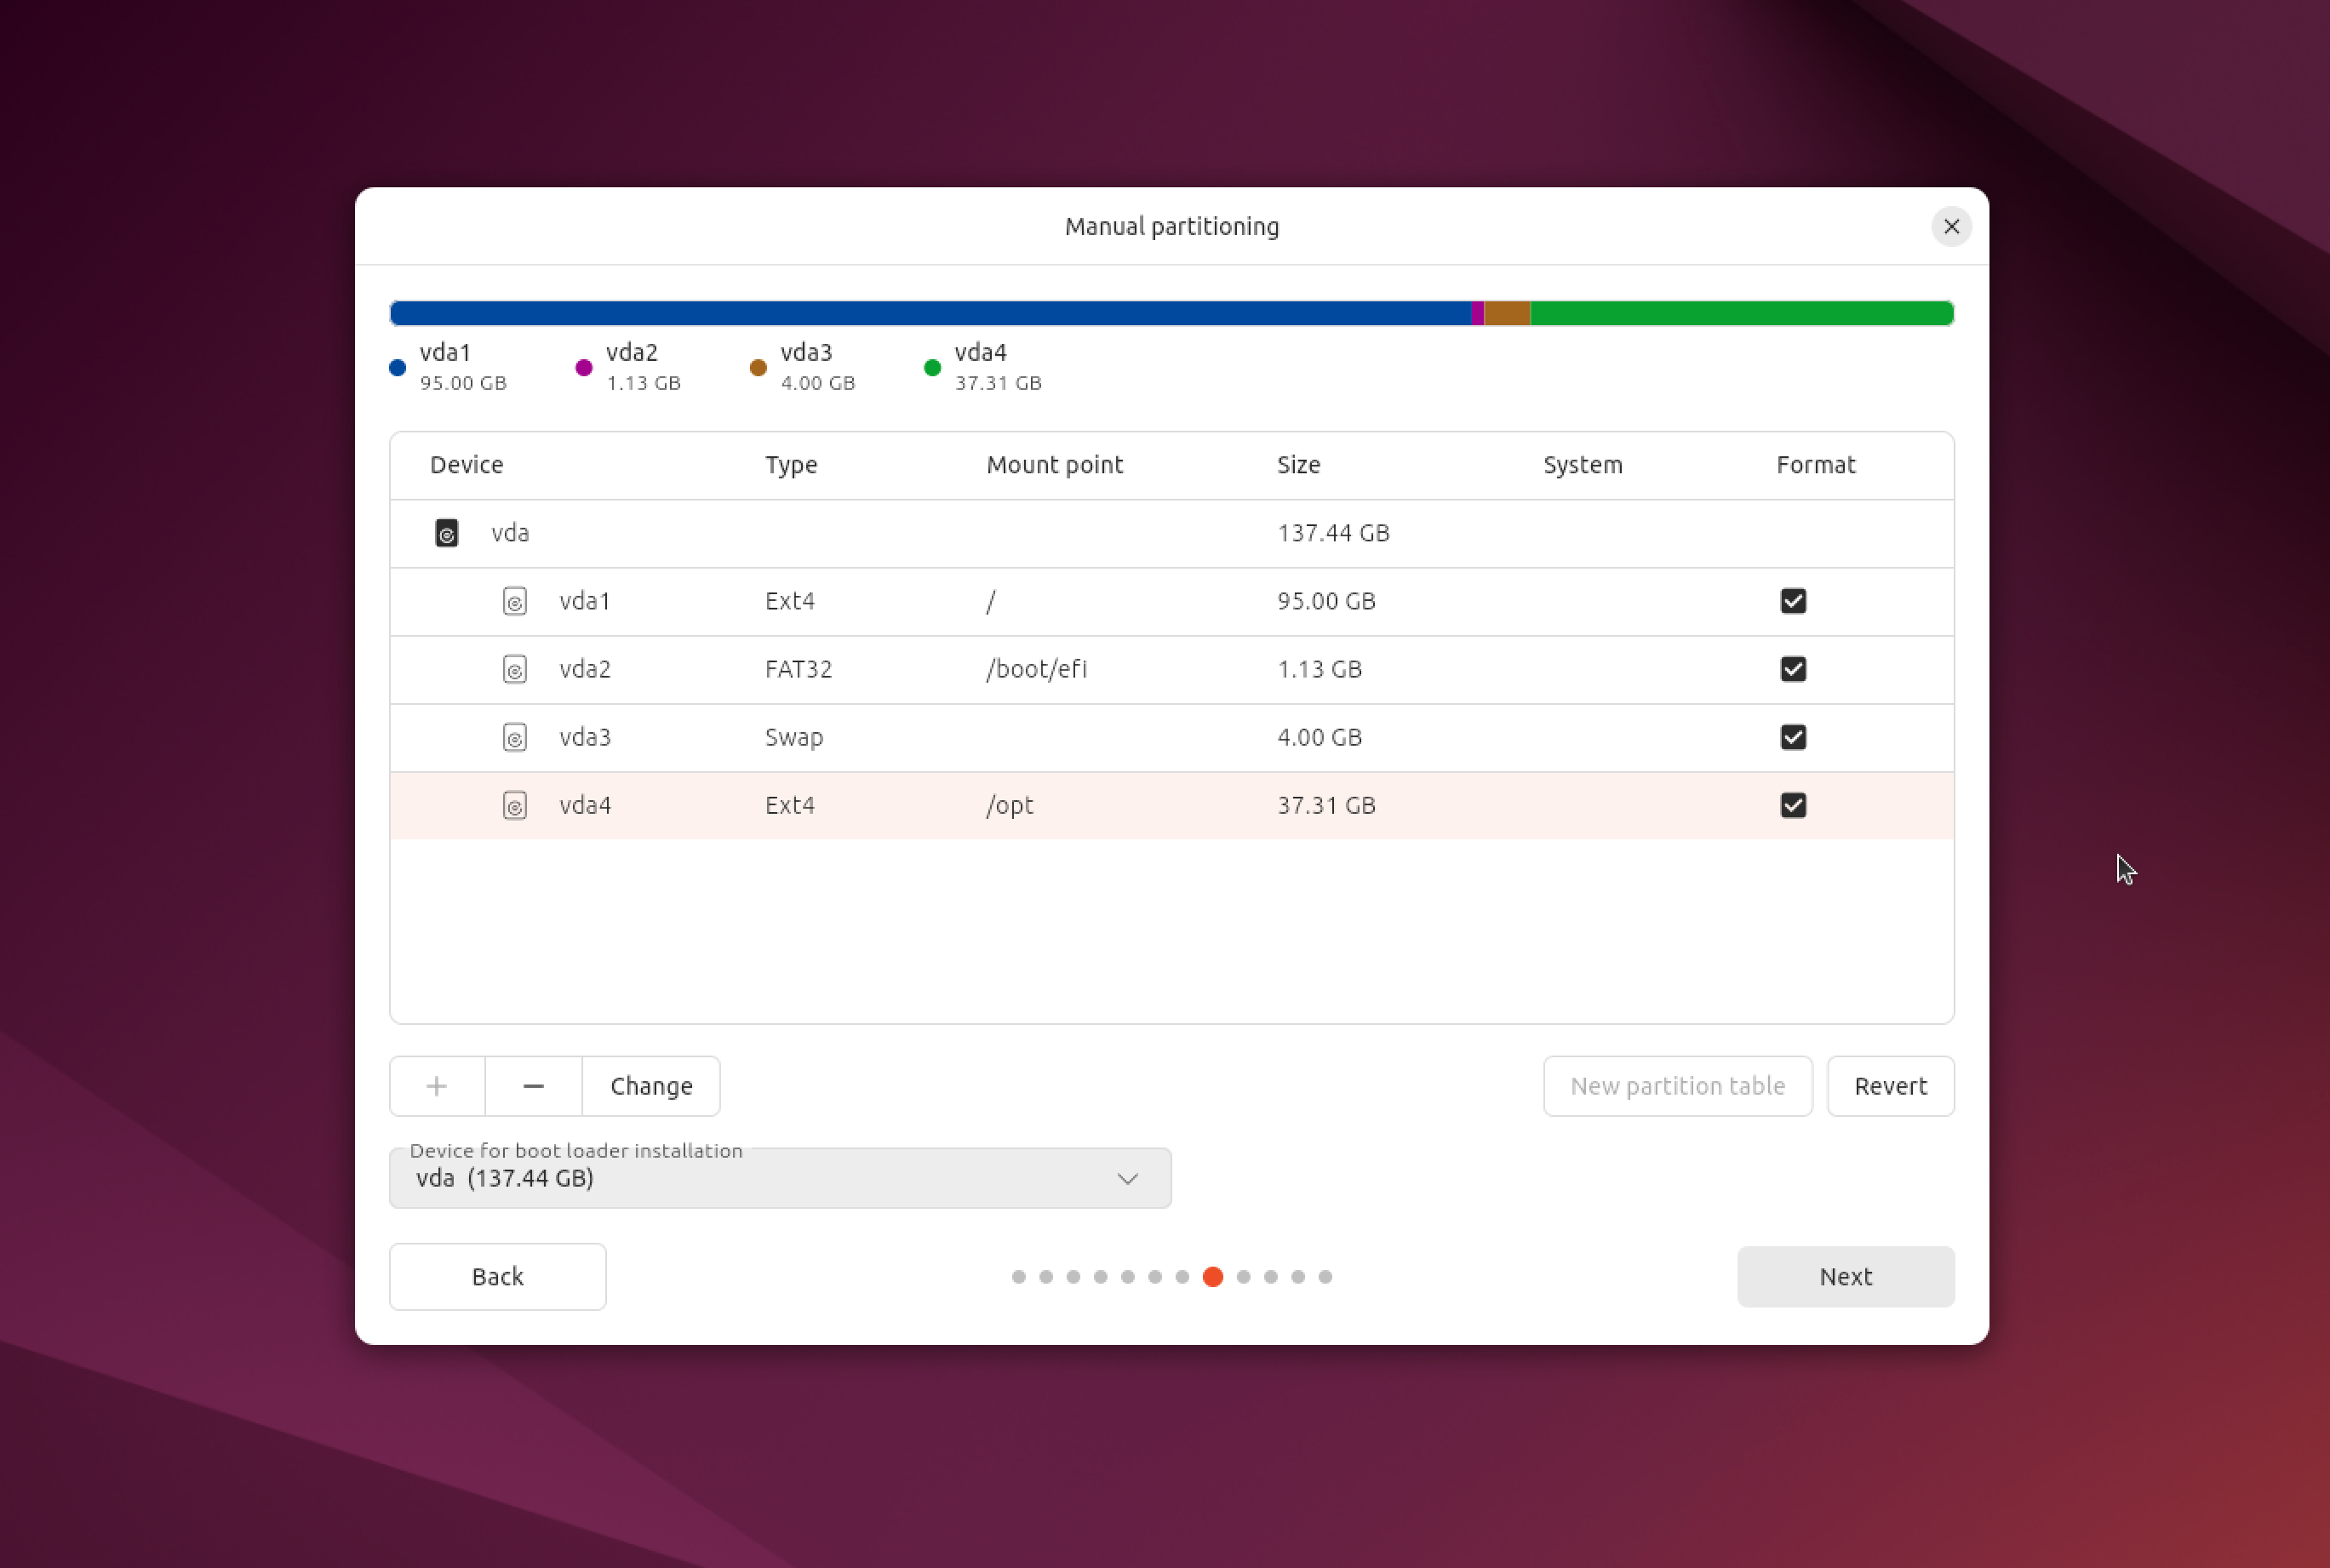
Partitioning Table
After the installation, you might want to set your filesystem (at /) as read-only (see below) to protect the system from modification or failure due to a sudden power loss leading to a hard power cut. This means your application can write to disk, but the changes are not persistent during reboots.
Therefore, I’m using the following partitioning table to create a separate partition mounted at /opt/, which will be mounted as read-write. My kiosk application’s home and installation location will be here, allowing it to write files persistently (such as cache, temp files, media files, logs, etc.):
- 20 GB –
/opt/– ext4 - 2 GB –
swap - 95 GB –
/– ext4 - 1.5 GB –
/boot/efi– VFAT (or FAT32 depending on the installers proposal)
Values are given as approx. and should suite your needs.
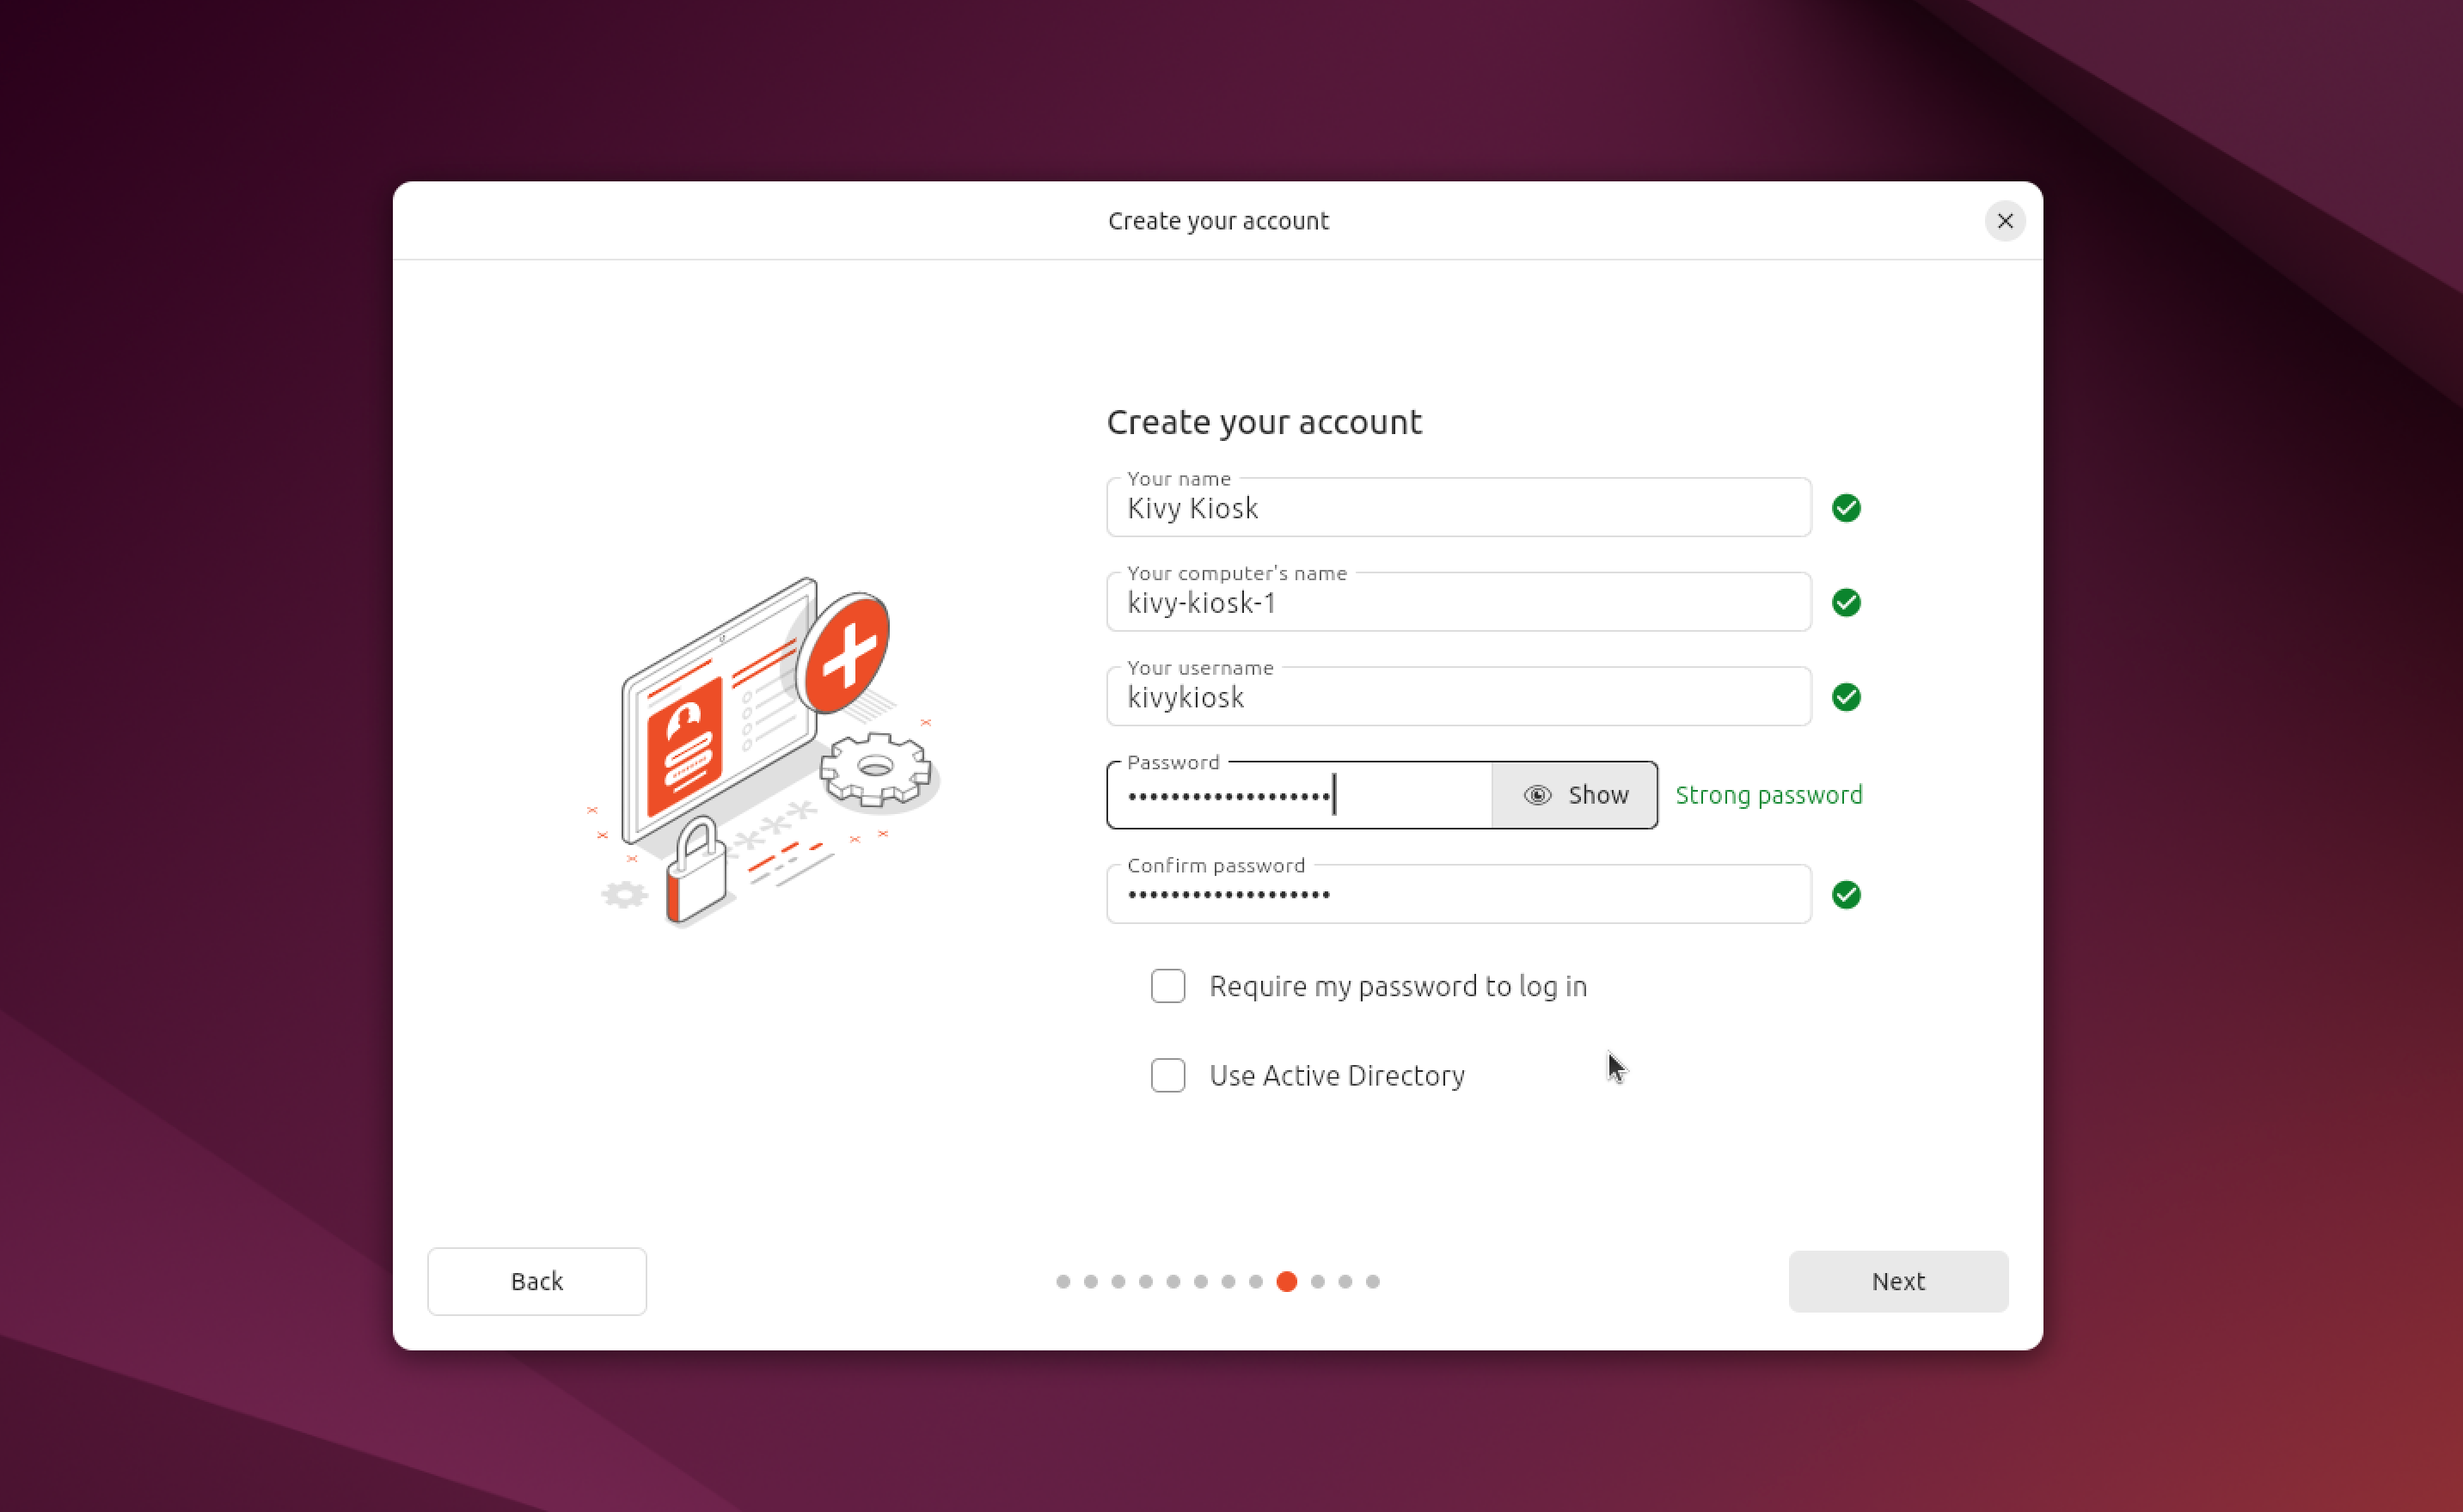
Automatic user login
During installation, you can enable automatic user login for the user you create – simply uncheck "Require my password to log in". This ensures that no login prompt appears after system boot and that the configured user logs directly into the kiosk (or desktop) environment. This feature is crucial, as we are building a system designed to boot directly into the kiosk application.
Configuring the newly installed system
After the installation is finished, we start by installing required software dependencies. In addition, this is a good time to check for system updates and install them.
Installing software packages
Let's start with two essential packages for our purpose:
- SSH Server –
sudo apt update && sudo apt install openssh-server - GNOME Kiosk –
sudo apt install gnome-kiosk gnome-kiosk-script-session
Start your terminal and fire these commands to install the SSH server and GNOME Kiosk session. SSH is required for management and administration purposes (once the system is rolled out), and the latter is required to use our system in kiosk mode.
System configuration
Now let's continue with the system configuration. Depending on the use case, there are several things to consider. Let’s start with some obvious ones:
- Energy settings: the system should not dim the display or go into sleep mode
- Set display brightness (and probably audio settings, if required by your use case)
- Disable automatic lock screen and disable automatic user logout
- Date and Timezone / Physical system location
Kiosk systems are always on, inviting persons nearby to use them.

The enumeration above is definitely not exhaustive — in my opinion, these are just the most obvious ones when I think about kiosk applications.
Of course, there are many more, such as setting the kiosk user’s privileges for hardware access (for example, if your kiosk application needs to communicate with a serial device, the kiosk user needs to be added to the dialout group: sudo adduser yourUsernameHere dialout), as well as firewall and network settings depending on the environment where the system will be deployed.
Configuring the Kiosk
Configuring the kiosk mainly consists of adding our application to the GNOME kiosk session script. First, we test the kiosk environment – after that, we define the launch command for our kiosk application and add it to the kiosk script.
Starting the GNOME kiosk for the first time
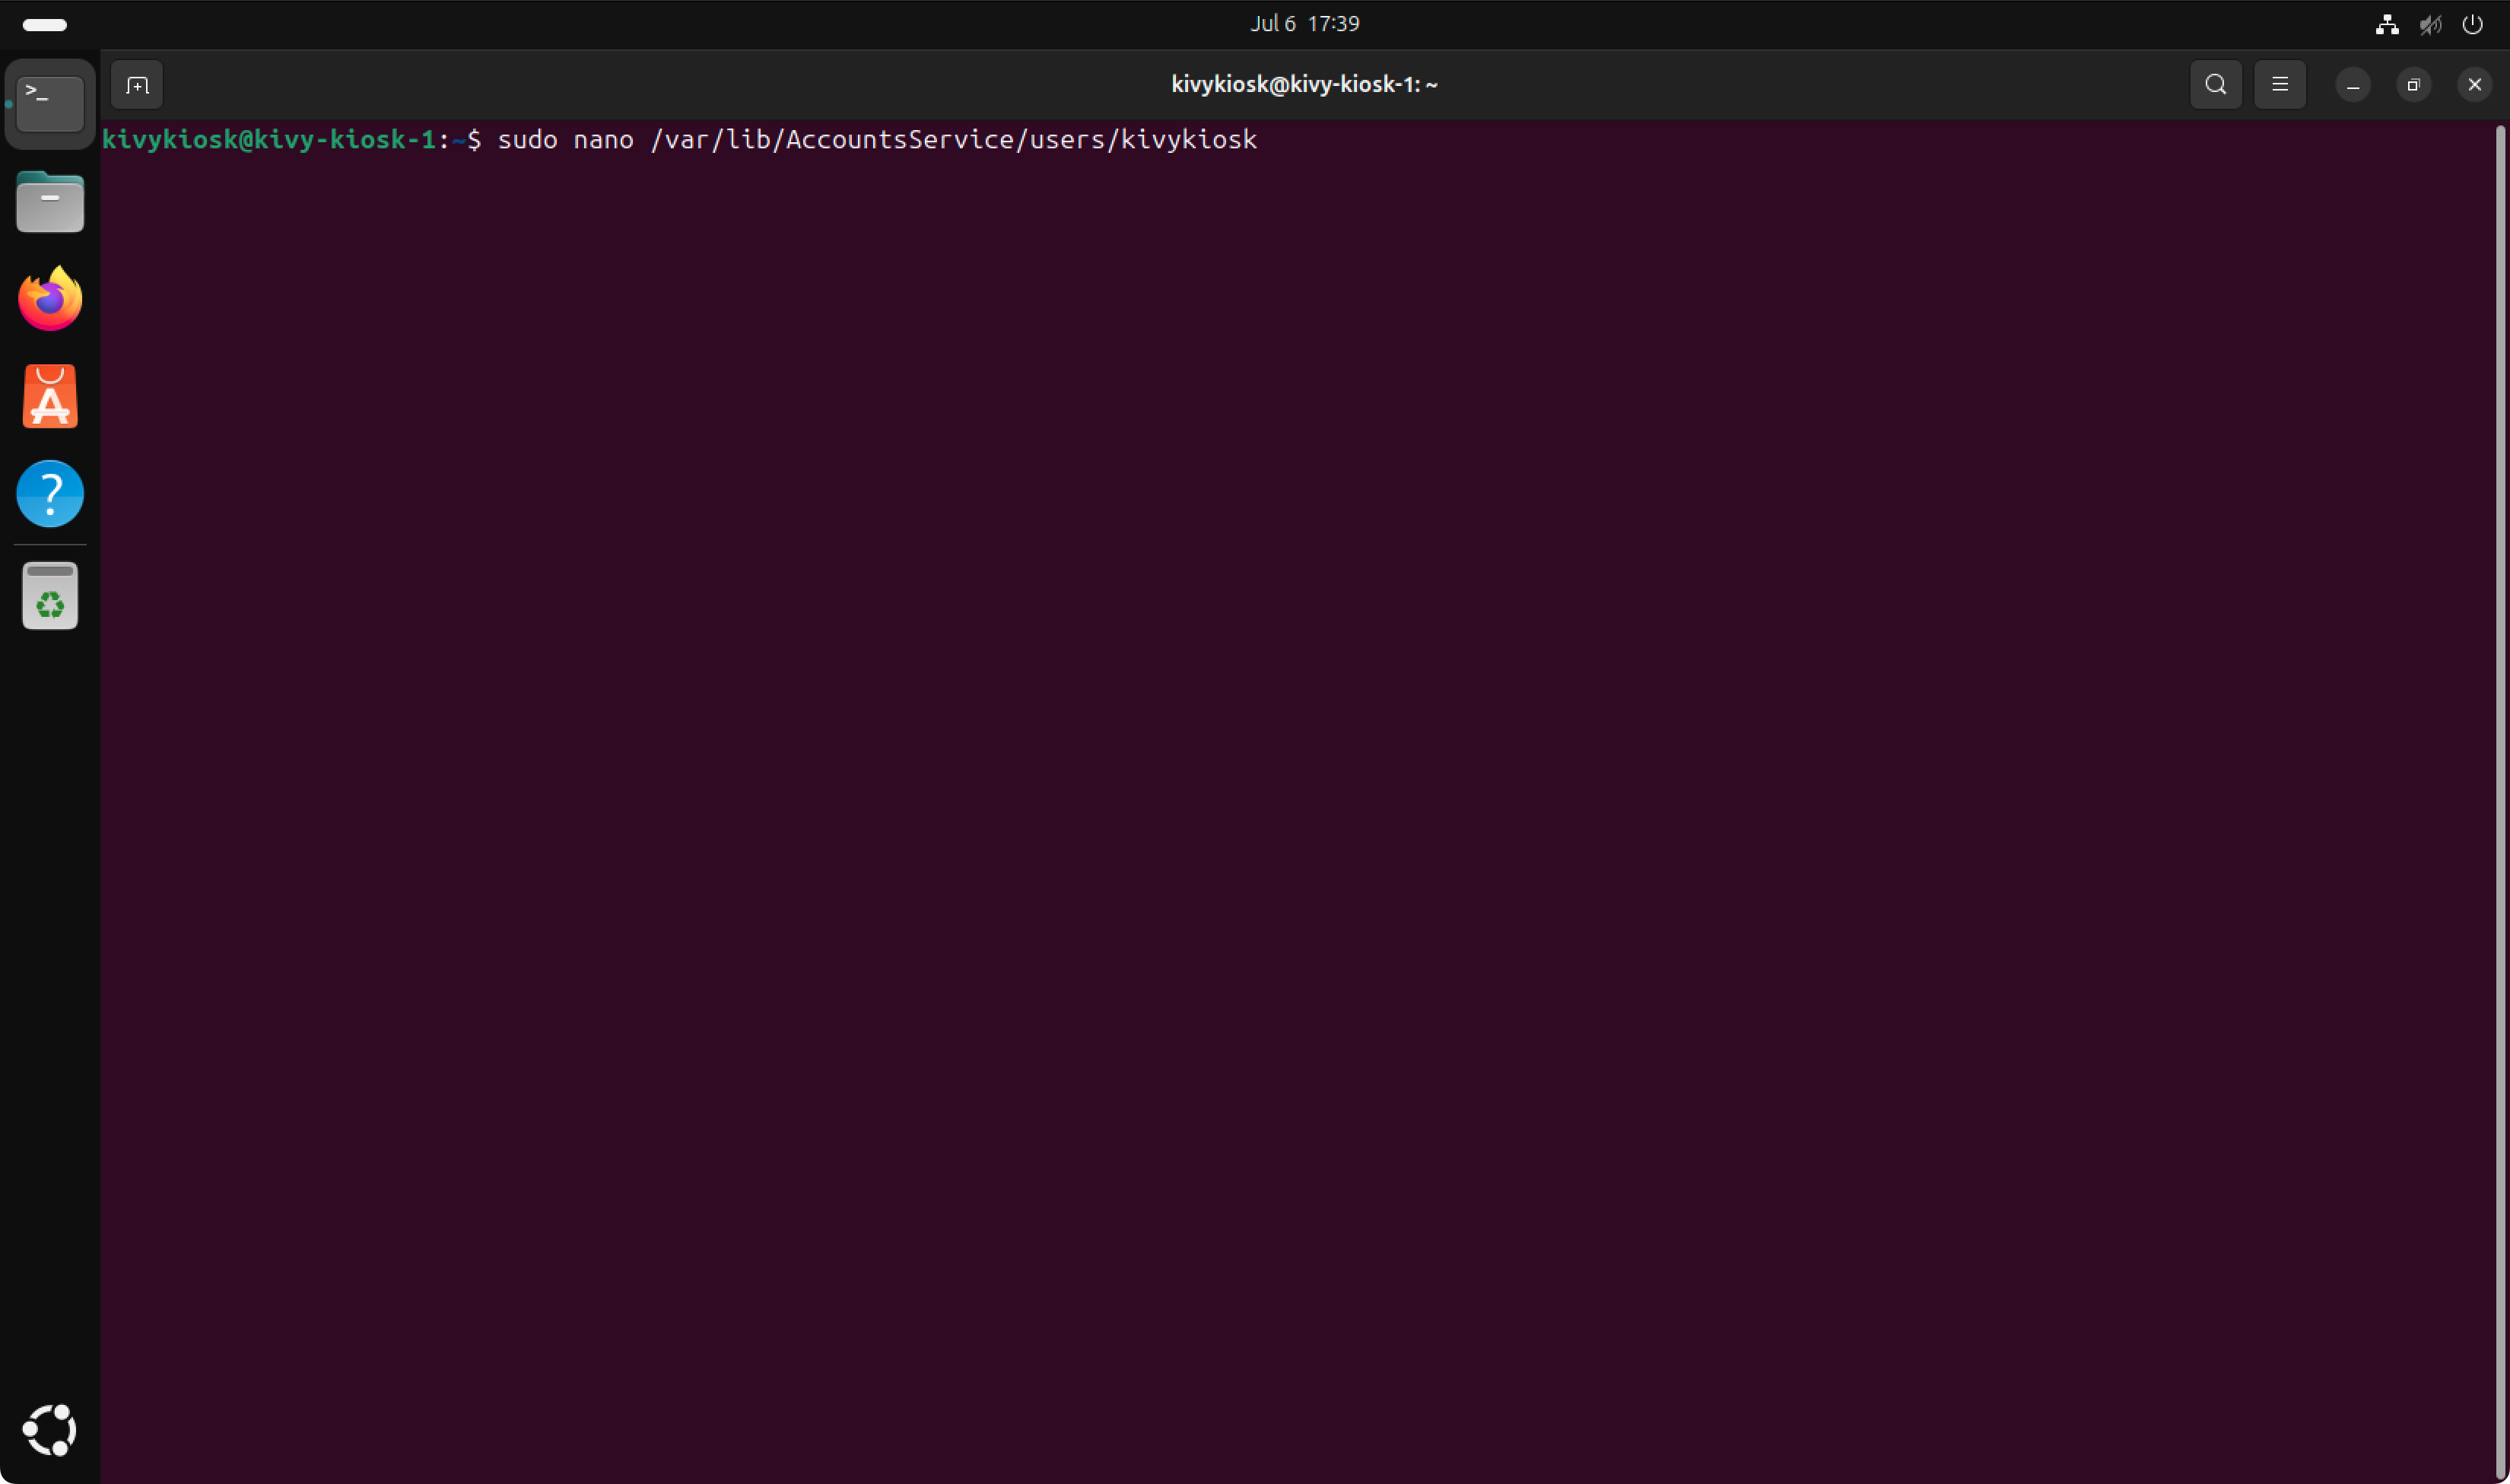
Starting the system in kiosk mode is done by telling the session manager to use the GNOME kiosk environment instead of the "normal" desktop environment. The session configuration file is located at /var/lib/AccountsService/users/yourUsernameHere.
In my case, I use sudo nano /var/lib/AccountsService/users/kivykiosk to open the session configuration file. To start in kiosk mode, make sure to set Session to gnome-kiosk-script-wayland.
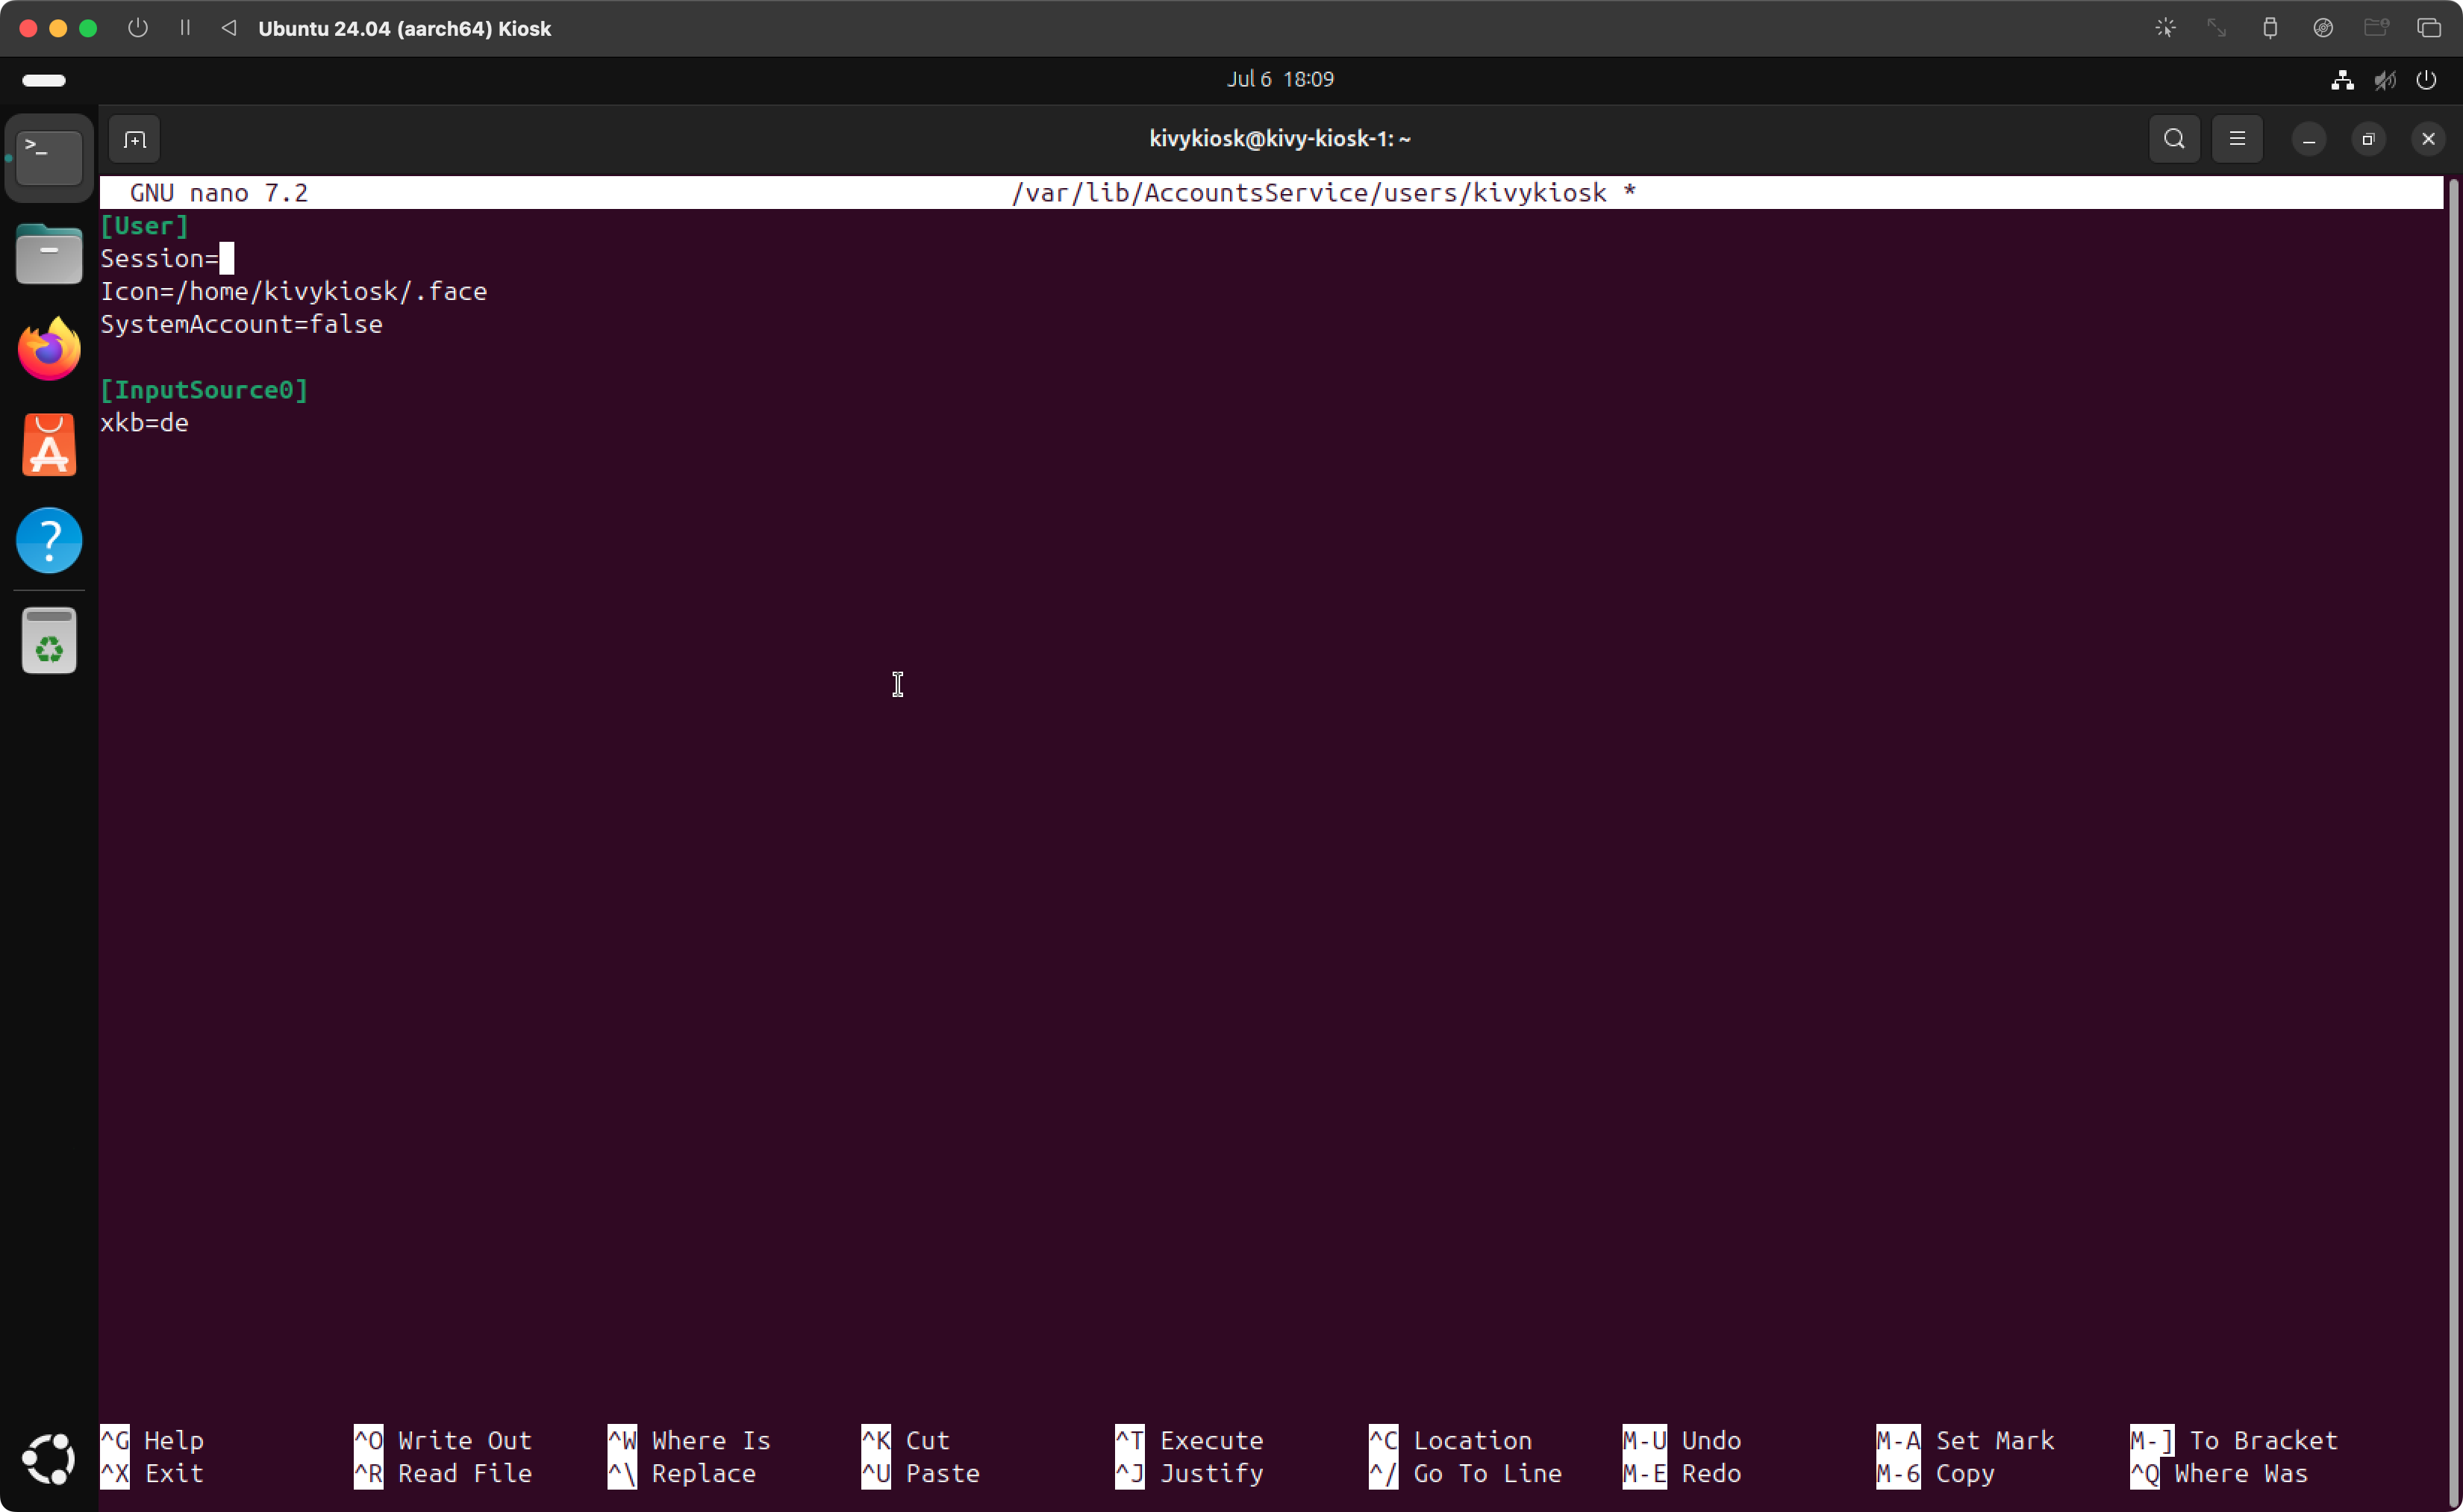
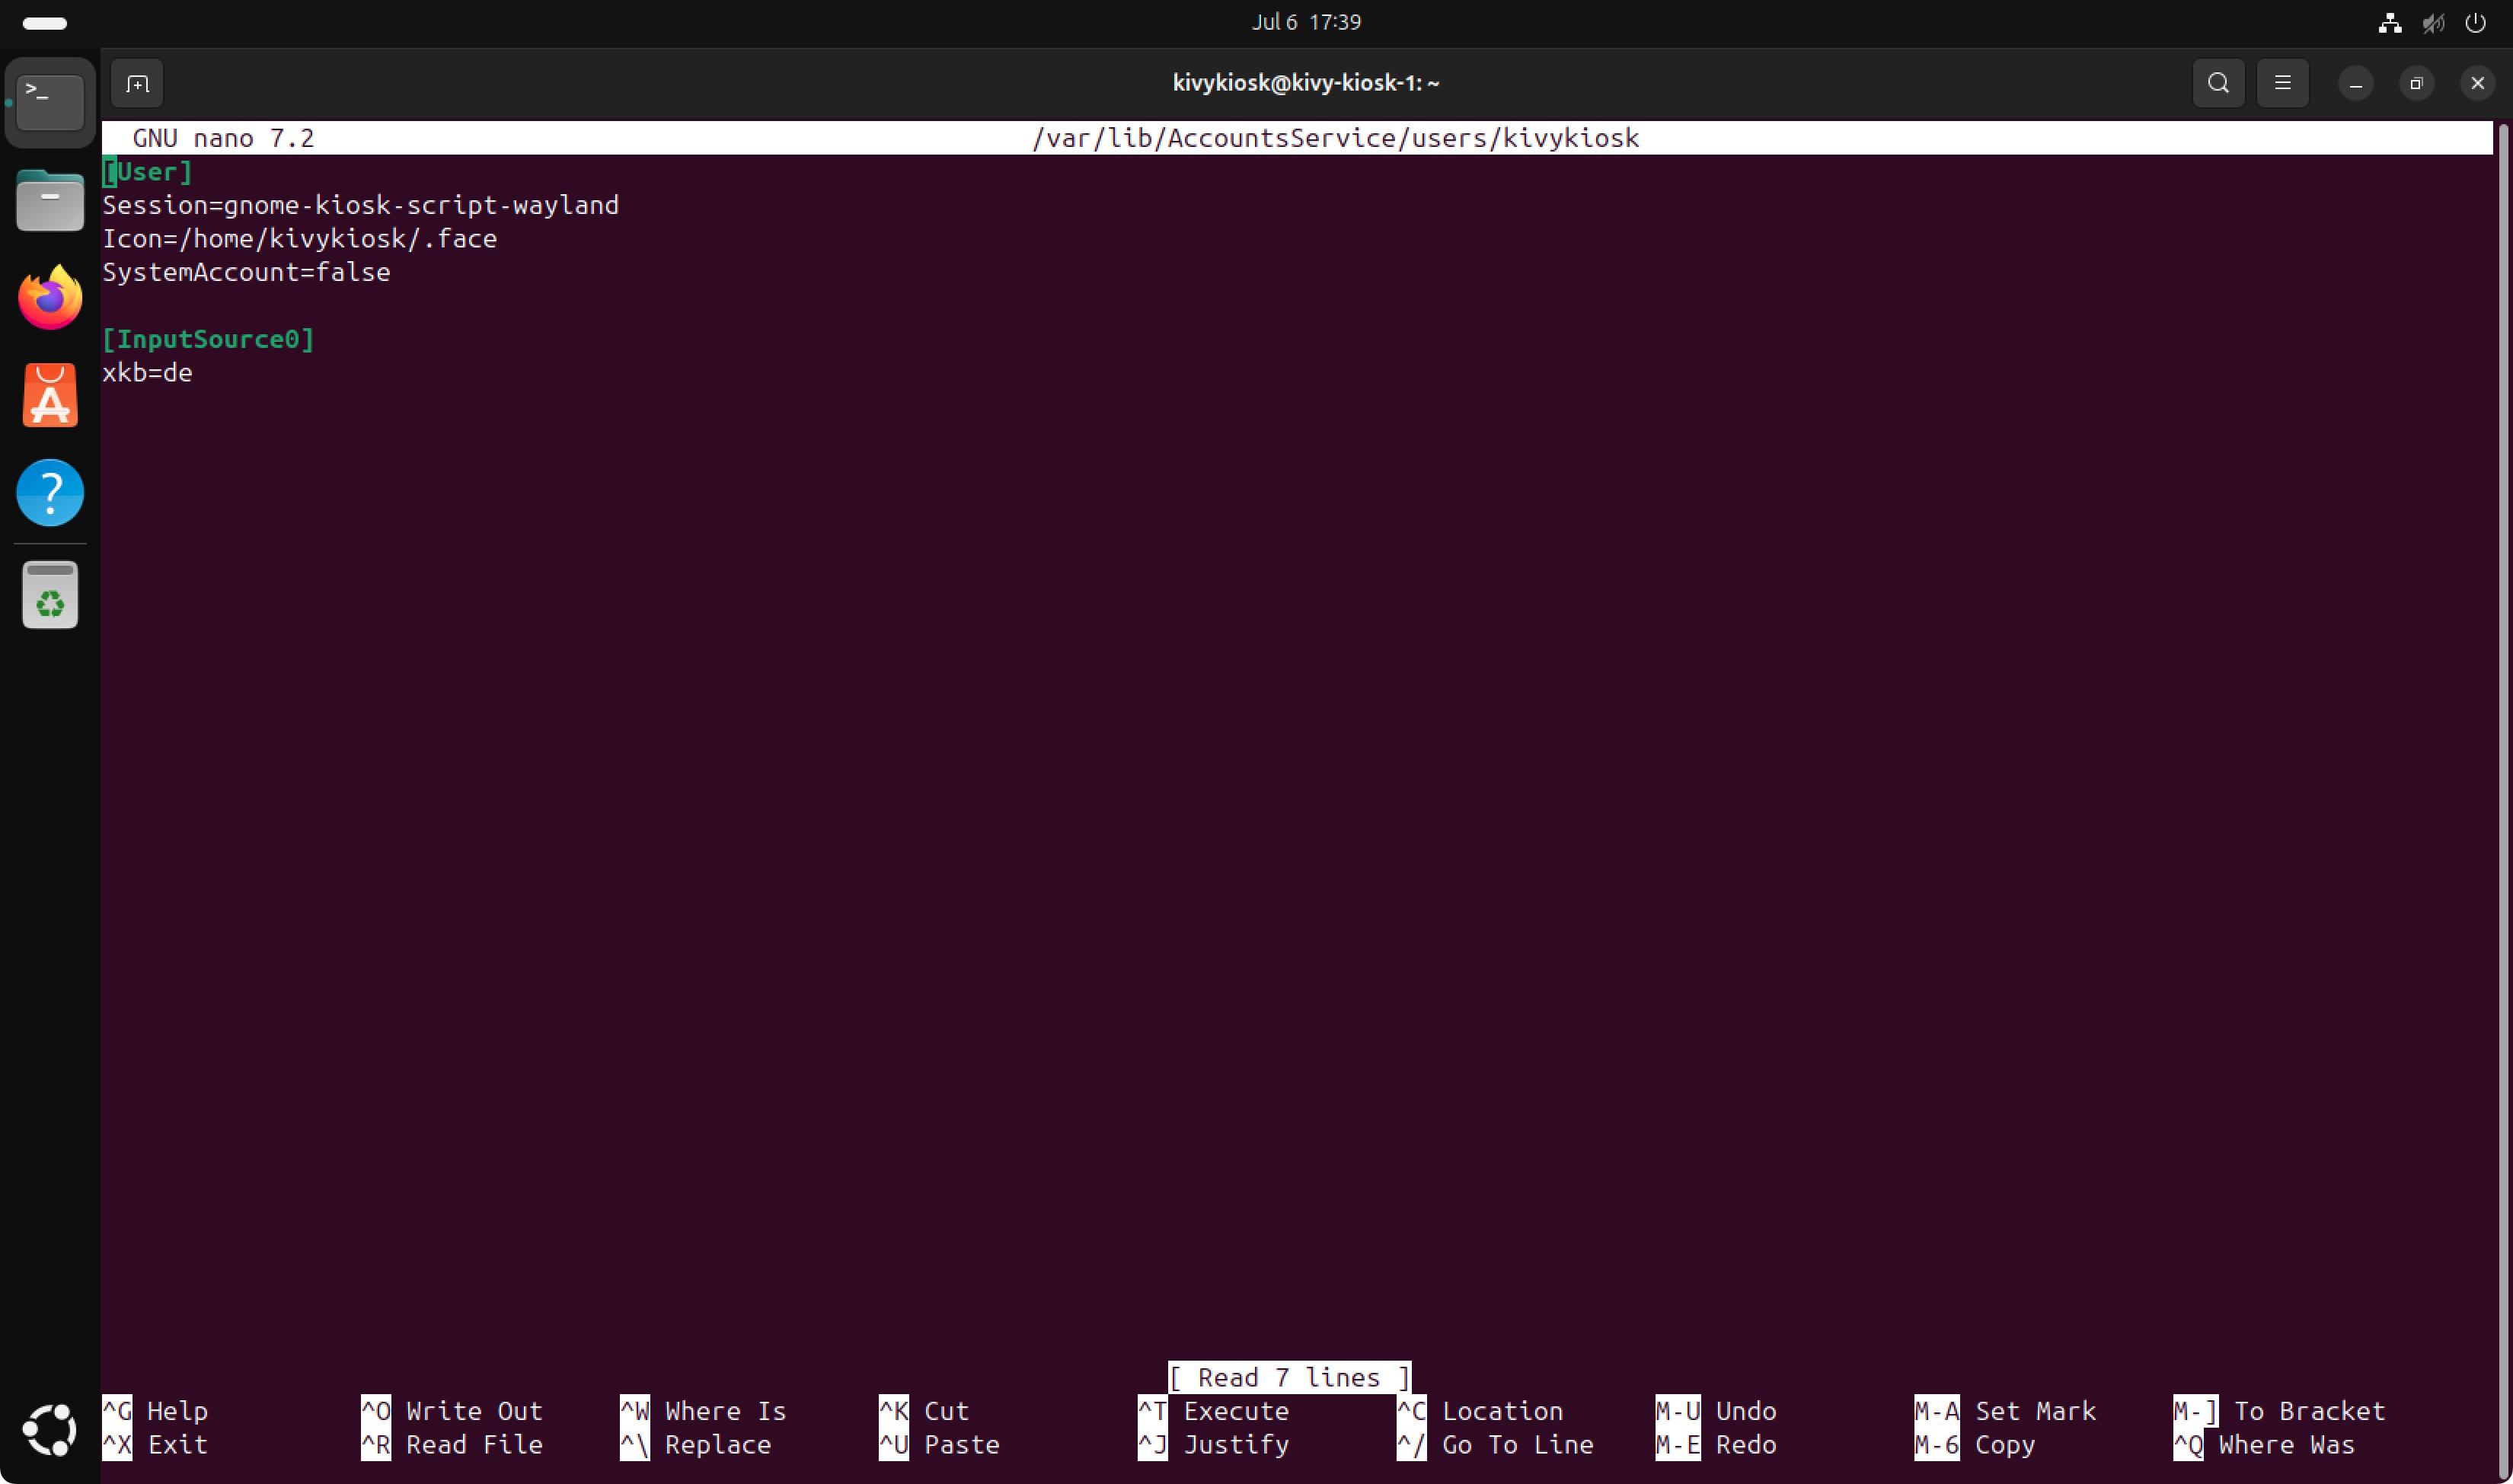
In the end your session configuration should look like this to boot directly into the GNOME kiosk session:
[User]
Session=gnome-kiosk-script-wayland
Icon=/home/kivykiosk/.face
SystemAccount=false

[InputSource0]
xkb=de
If you need to switch quickly between both modes, it may be convenient to keep both configurations but comment out the one you’re not using:
[User]
Session=gnome-kiosk-script-wayland
#Session=ubuntu
Icon=/home/kivykiosk/.face
SystemAccount=false

[InputSource0]
xkb=de
Be Careful: Make sure to have SSH enabled and tested. If your system is not having a physical keyboard (as mine), you need SSH access to change the session configuration and switch back to the desktop environment.
I am using wayland compositor for this project, but using X11 follows the same procedure. Just set session to gnome-kiosk-script-xorg for GNOME kiosk environment or to ubuntu-xorg for GNOME desktop.
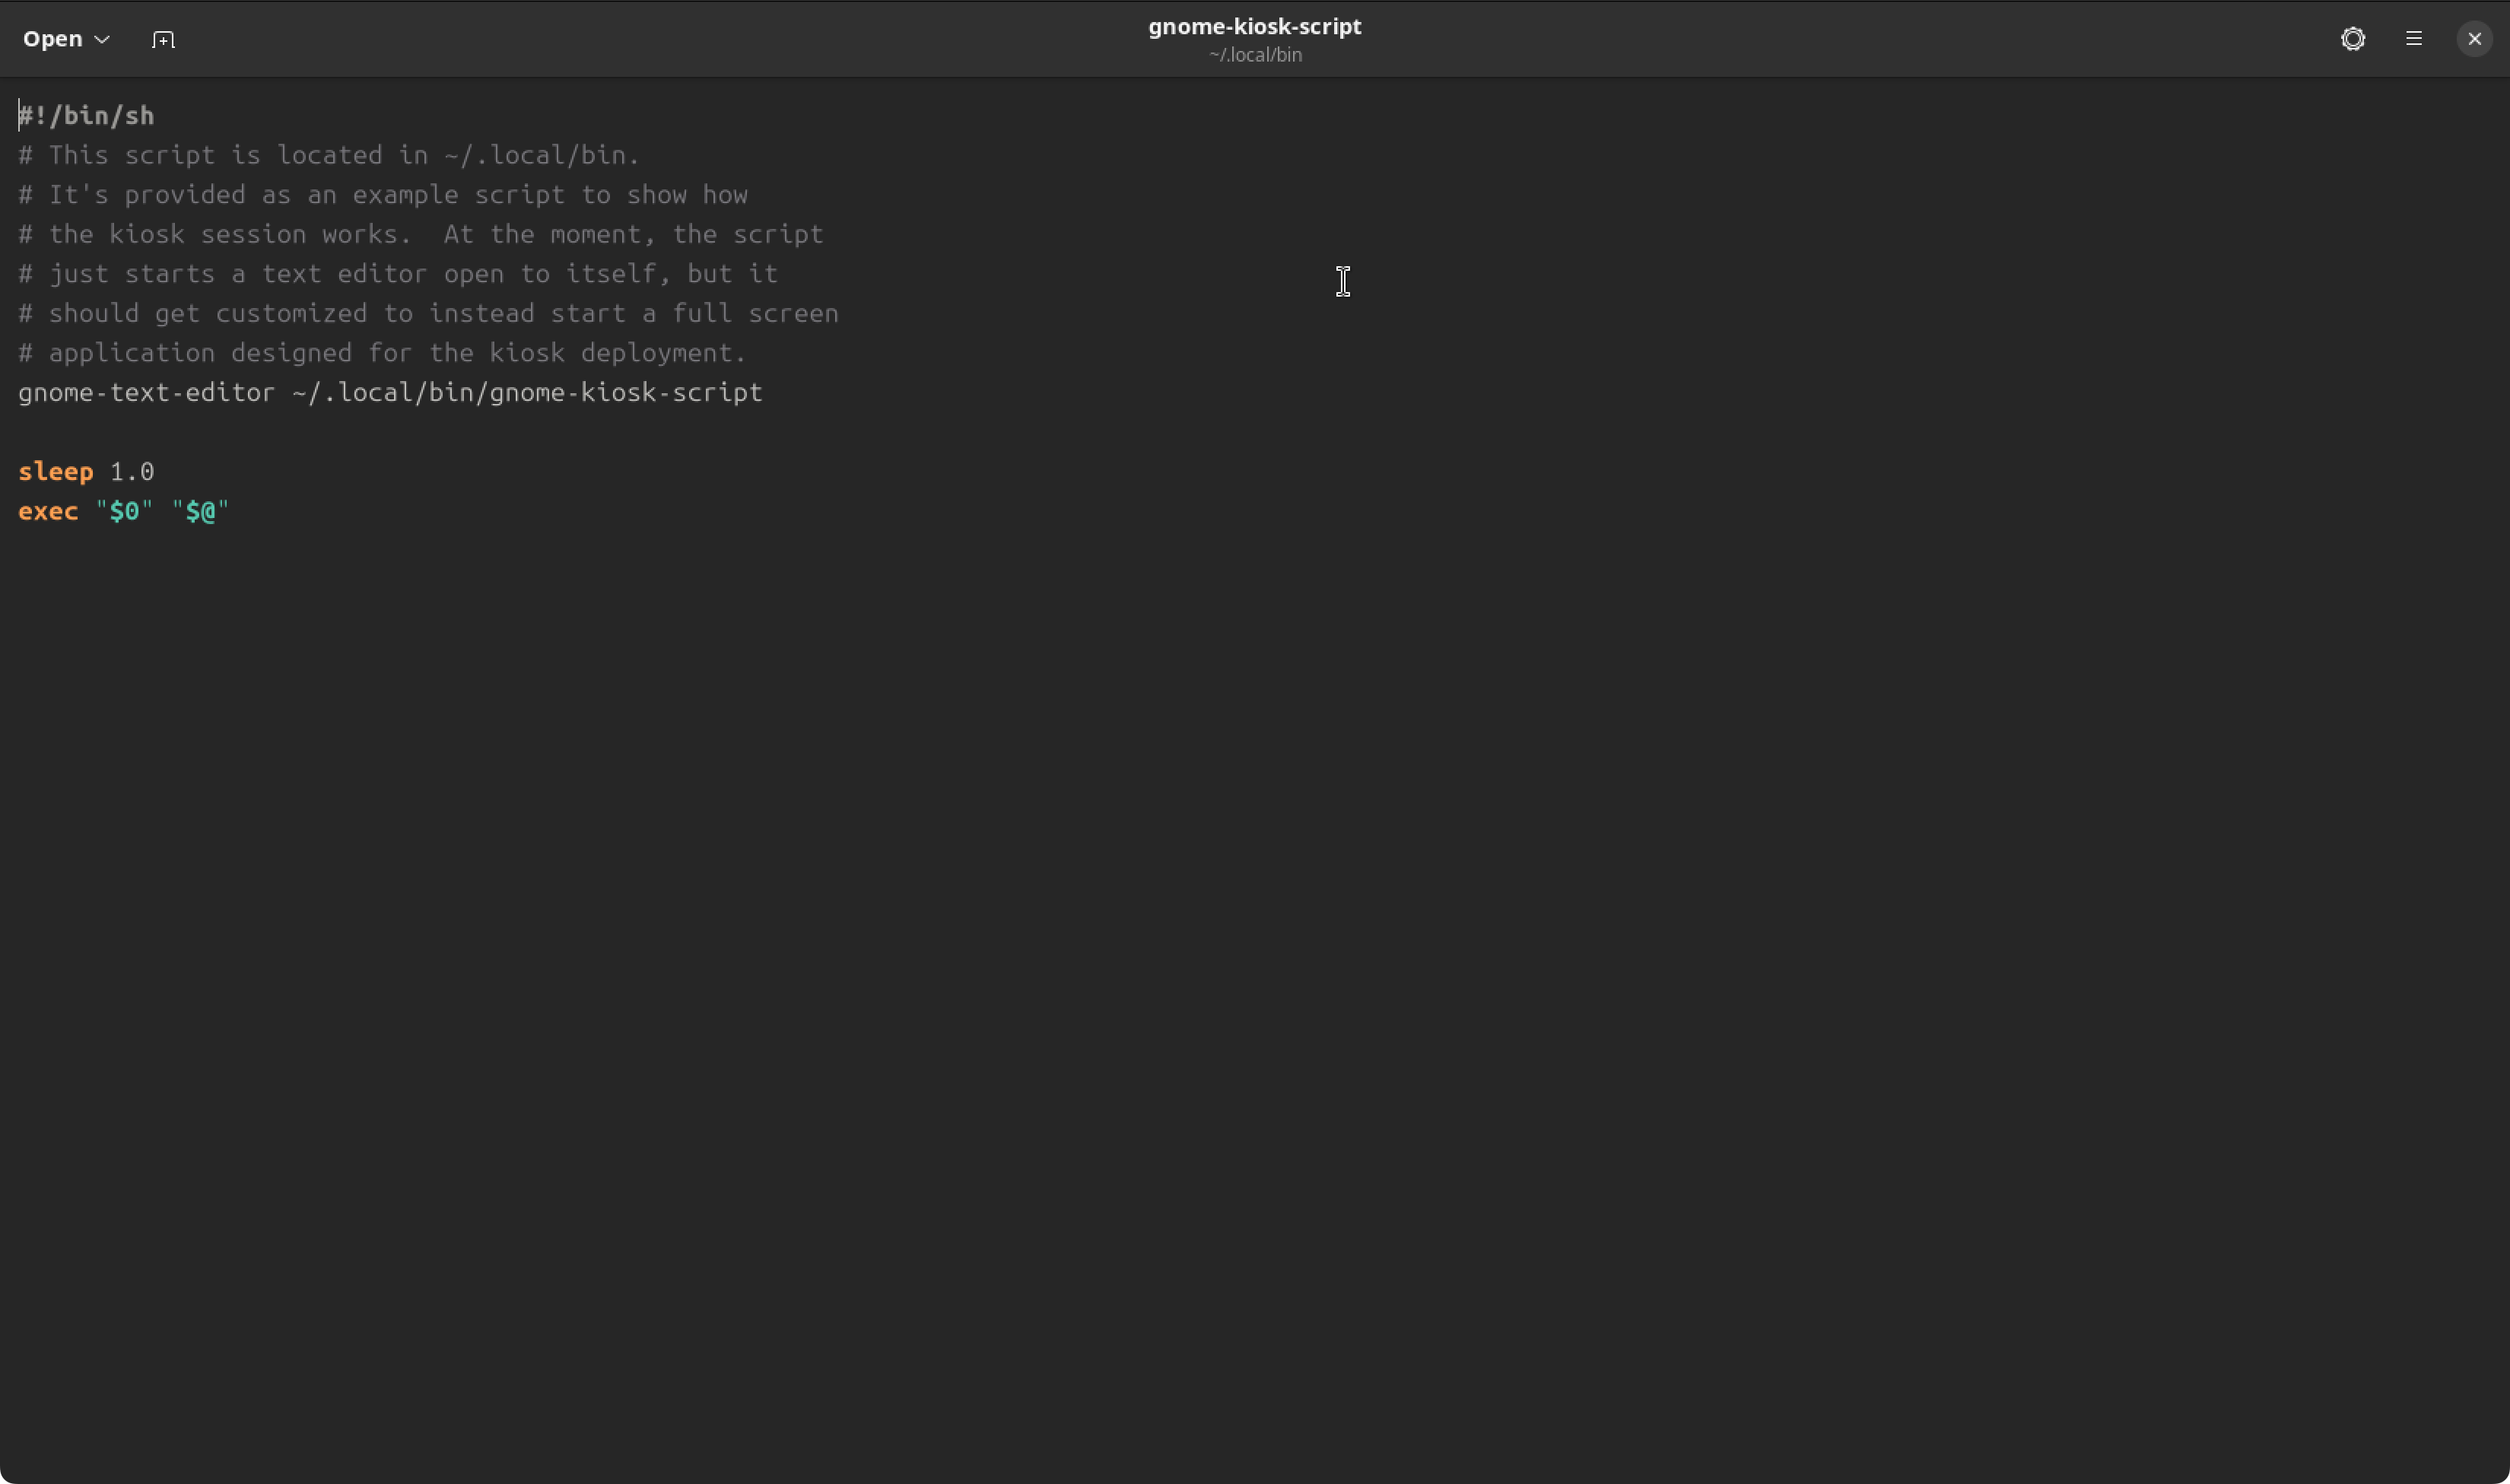
When starting the kiosk mode for the first time, GNOME presents its kiosk configuration script using the gnome-text-editor. There, we will put the launch command for our kiosk application.
Before adding the launch command to the script, we need to define and test it. We'll do this in our desktop environment, therefore edit your AccountServices configuration again to boot into the desktop mode.
Define the Launch Command and Parameters
First, we need to define a shell command which starts our application the way we want. For kiosk applications, this mostly includes fullscreen mode and no window decorator. Let's assume we want to build a reading kiosk based on Firefox and medium.com.
The corresponding command to launch Firefox in fullscreen mode (without a window decorator) browsing to a specific URL is quite simple (because Firefox supports being run in kiosk environments using --kiosk argument): firefox --kiosk https://medium.com
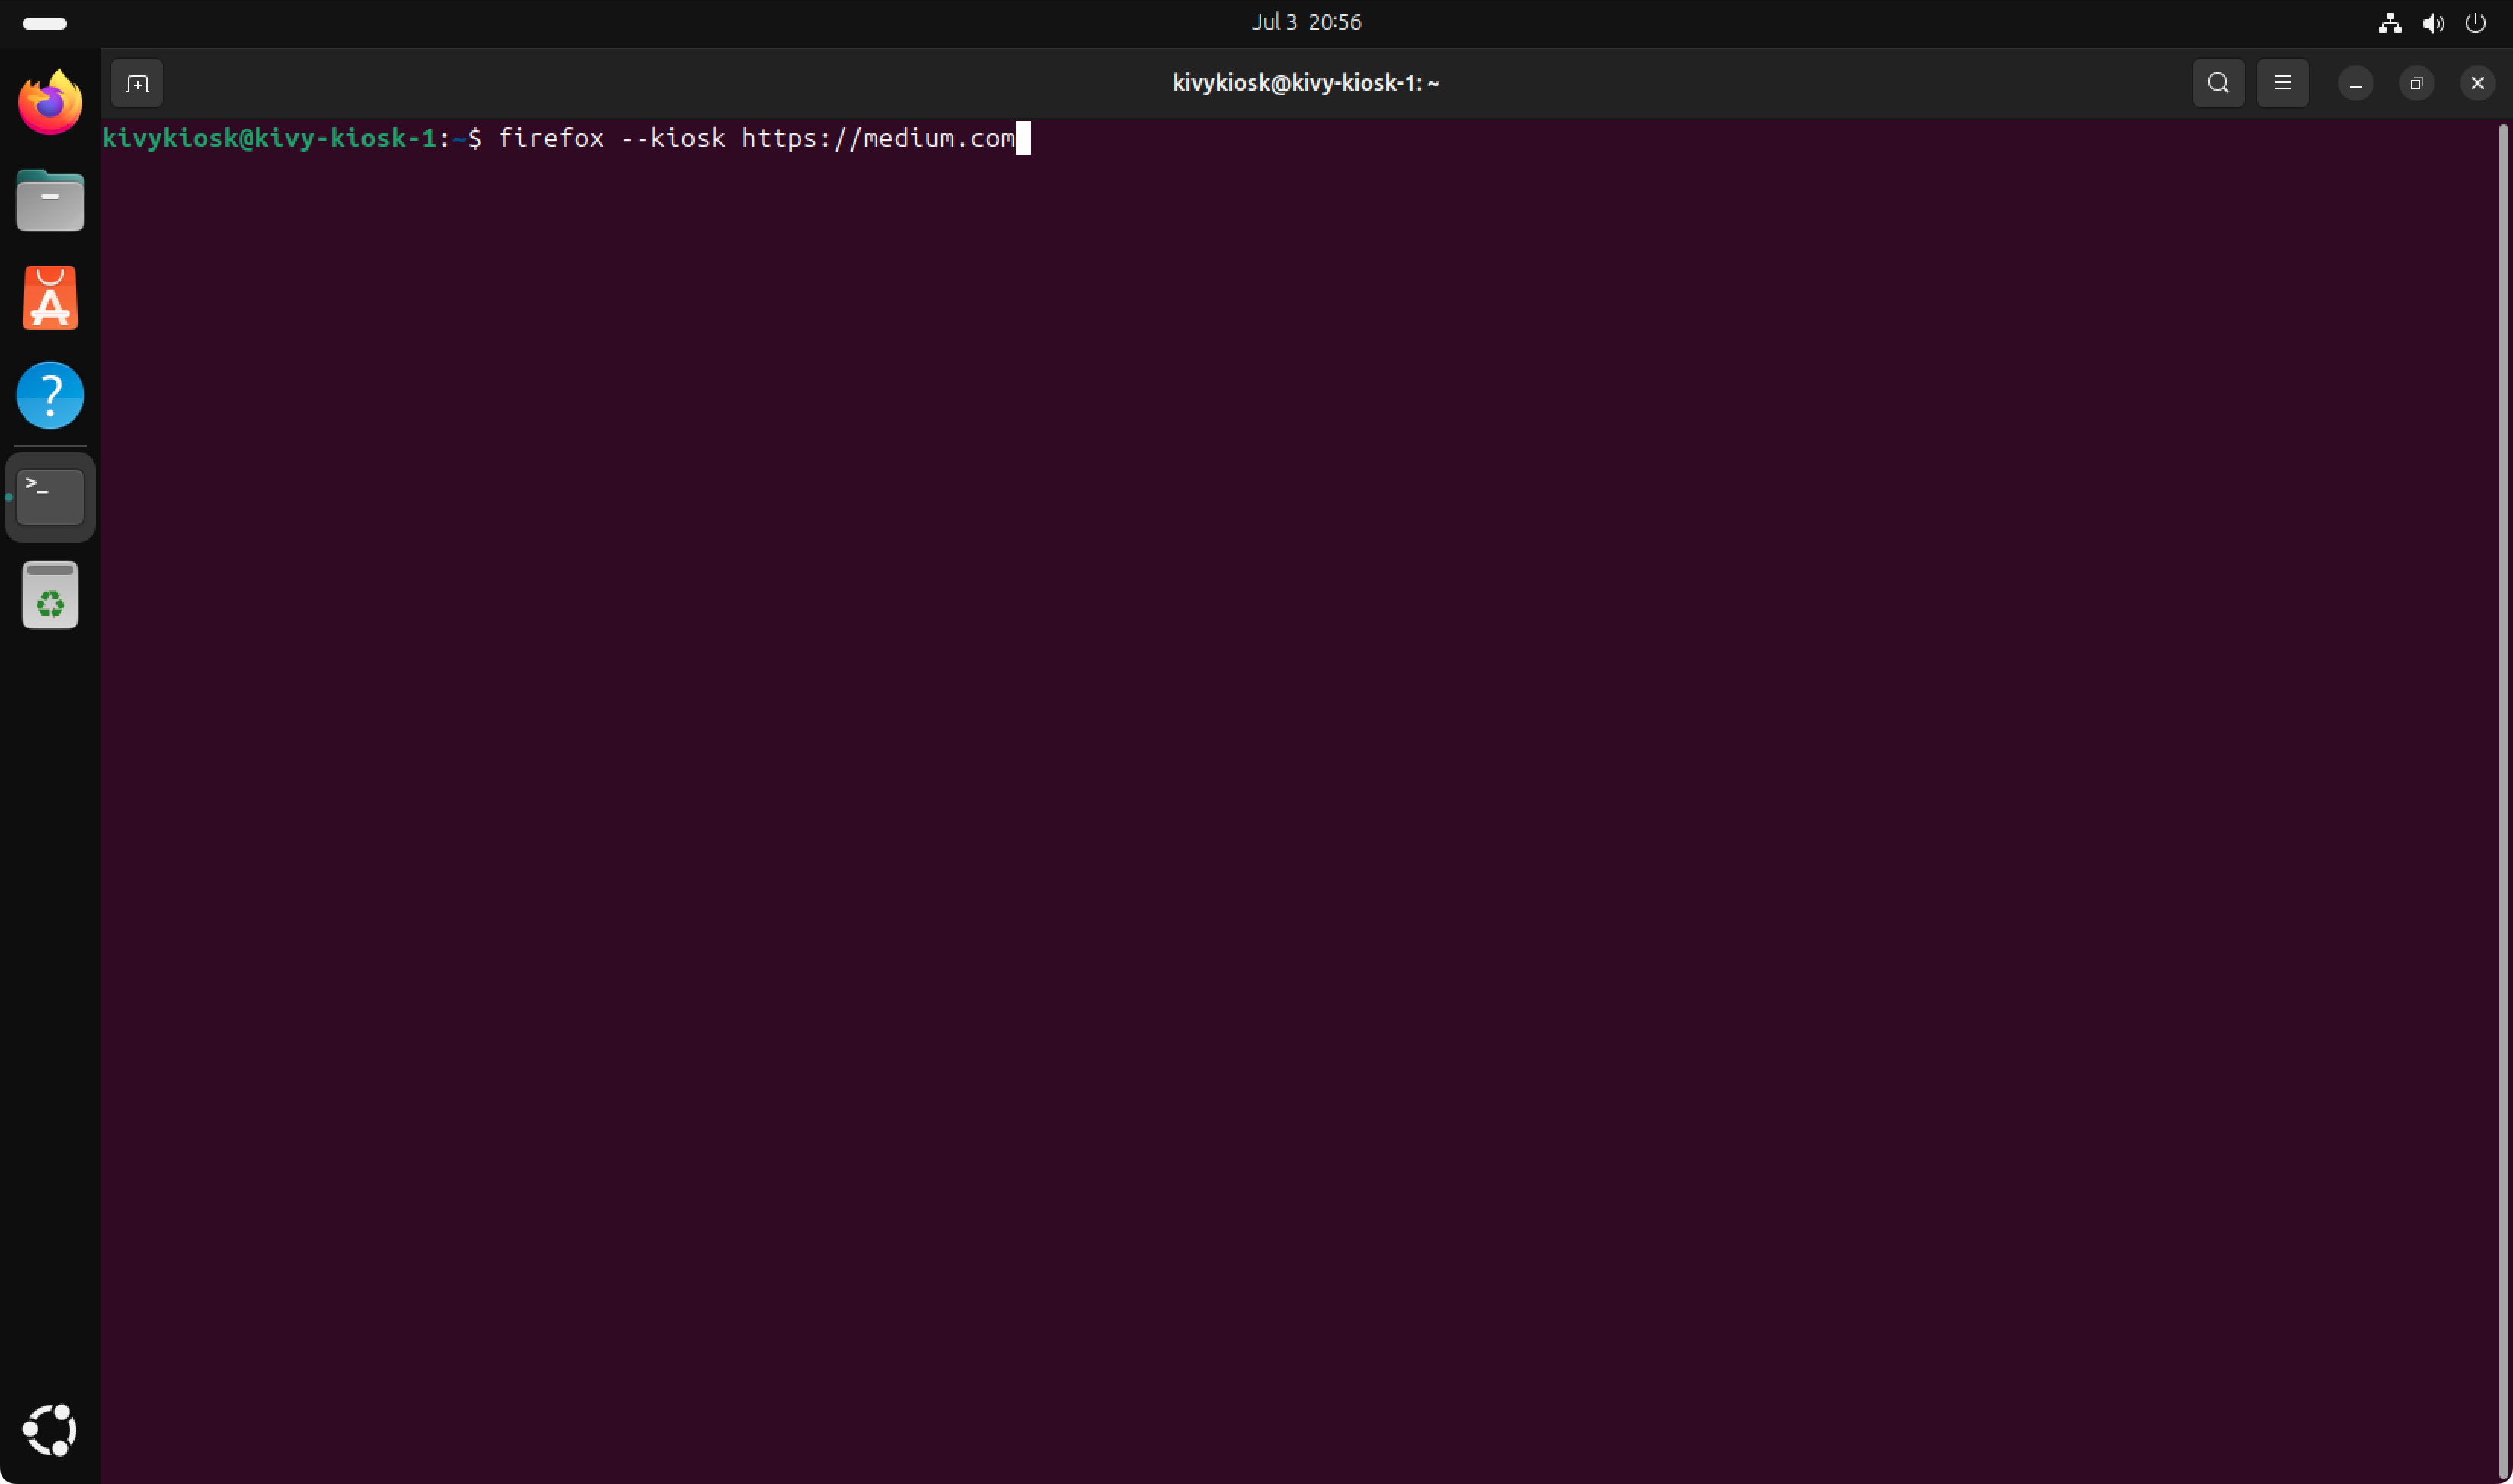
Fire this command and you'll see Firefox opening in fullscreen, showing the medium.com homepage. There’s no window decorator or address bar — just the plain website in fullscreen mode – Check ✅ .
To quit Firefox when running in kiosk mode, use the keyboard shortcut: ctrl Q

Add the launch command to the GNOME Kiosk session script
Next, we'll add our launch command to the GNOME kiosk script. The script is located at ~/.local/bin/gnome-kiosk-script.
Use a text editor of your choice to edit the script. Here, I am using gnome-text-editor ~/.local/bin/gnome-kiosk-script to open the script. Remove or comment-out the default launch command and add the previously defined launch command instead. Hit save and reboot.
#!/bin/sh

firefox --kiosk https://medium.com

sleep 1.0
exec "$0" "$@"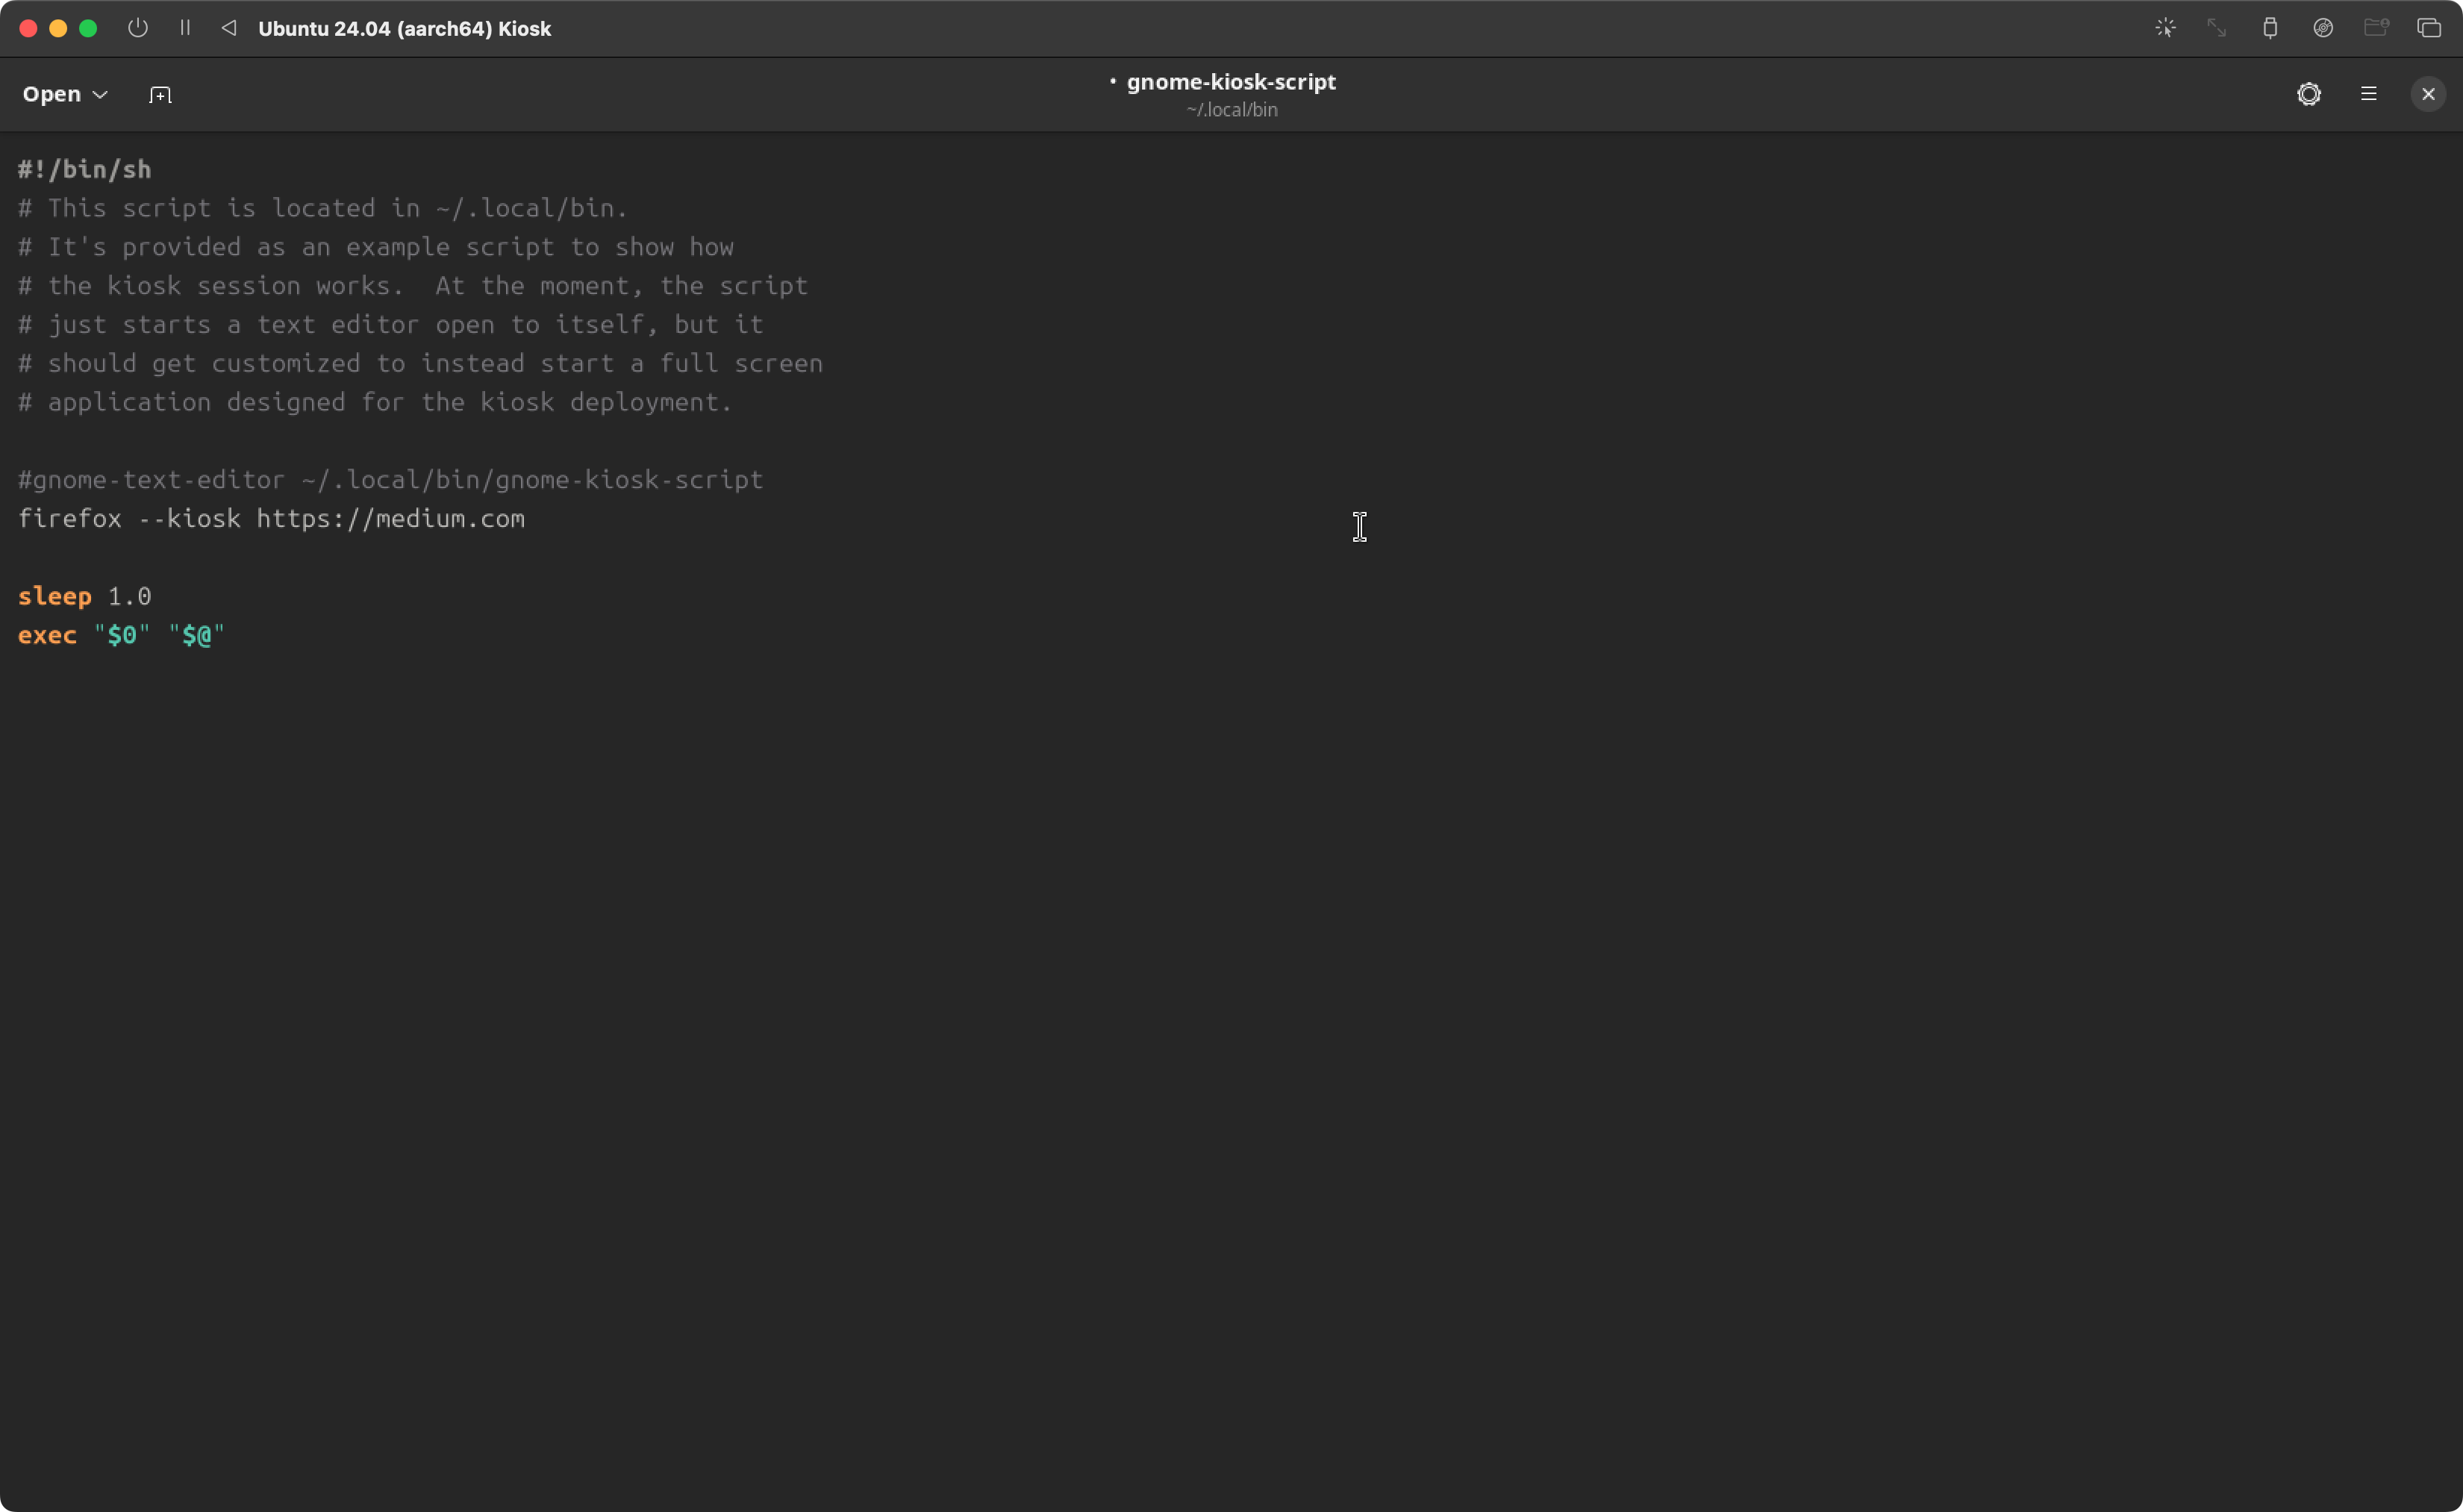

That's it. Our system is booting directly into the kiosk mode showing Firefox based on the launch command we defined previously – Check ✅ .
Configuring OverlayFS
In this step, we’ll set up OverlayFS to protect the system from modifications and make it more resilient to sudden power cuts (for example, when the system isn’t shut down cleanly and the power is simply switched off).
OverlayFS provides an effective way to protect a Linux system from unwanted changes by mounting the root filesystem as read-only and therefore prevents persistent changes during reboots. Write operations are redirected to RAM using the overlay and are gone after a system shutdown.
Installation
Support for OverlayFS is available in the Linux kernel by default, we just need to install the required packages:
sudo apt update && sudo apt install overlayrootThat's it – Check ✅ .
Enable OverlayFS
Enabling and configuring OverlayFS is straightforward, we now have a configuration file residing in /etc/overlayroot.conf. Open it with your favorite text editor (sudo nano /etc/overlayroot.conf) and add a single line at the end. Your configuration file should now look like this:
overlayroot_cfgdisk="disabled" # <-- most likely there by default
overlayroot="tmpfs:swap=1,recurse=0" # <-- added to enable OverlayFS
Reboot to make your changes take effect – but first, let's break it down what we just have done:
The option (at line 1) overlayroot_cfgdisk="disabled" disables to load overlayFS specific configuration from an attached drive before boot. Overlayroot supports a feature where it can read its configuration from a dedicated config disk at boot – we don't want and need this here, so we keep it disabled.
The actual configuration happens (at line 2) with overlayroot="tmpfs:swap=1,recurse=0", here we enable the overlay to redirect all write operations to RAM:
- Enables OverlayFS automatically on boot
- Upper layer lives in RAM (tmpfs)
- swap=1 allows temporary files to spill to swap if needed (look at our partitioning table above)
- recurse=0 controls whether overlayroot applies recursively to nested mount points (we don't want this, because we need
/opt/fully writable)
After the reboot you won't notice anything special at first, but to ensure OverlayFS was enabled you can do the following: Open the terminal and type df -h. This will give you a brief overview of your disk partitioning.
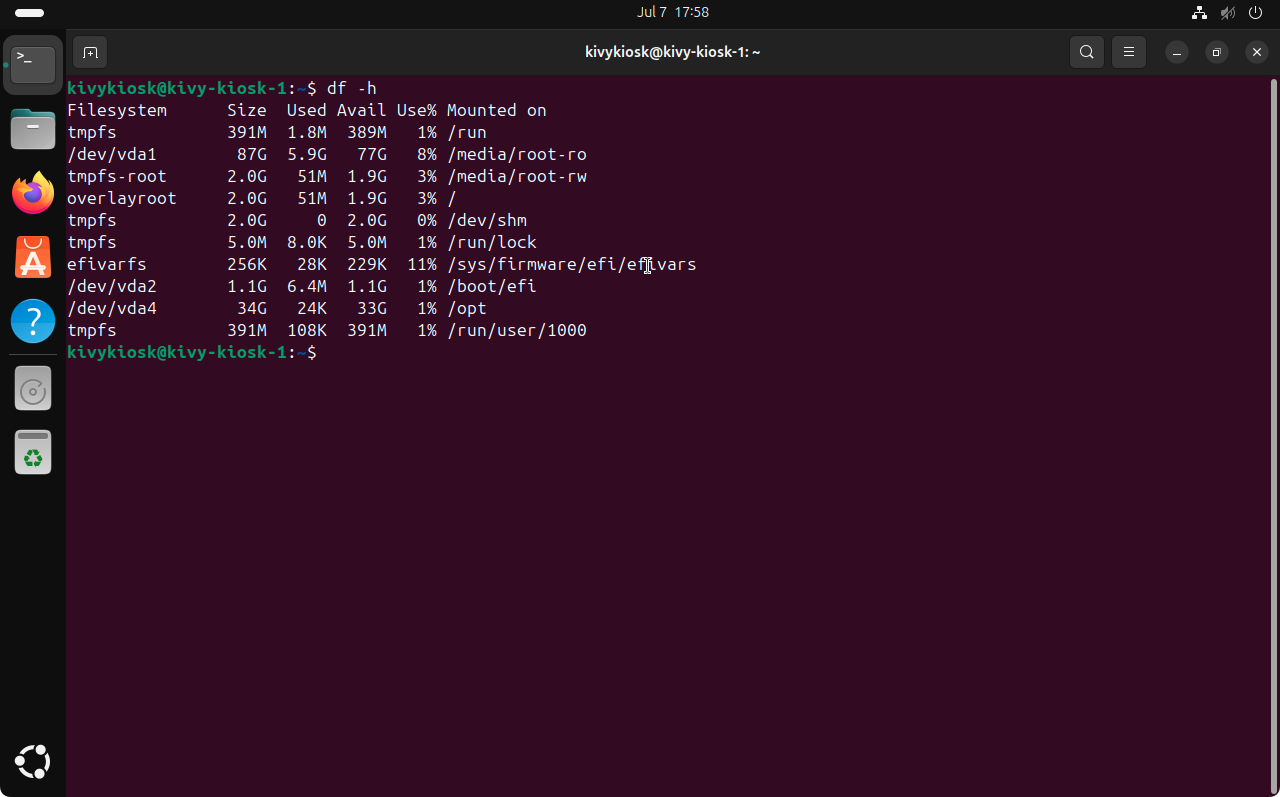
As you can see / is now labeled as overlayroot and you got two new mount points at /media/root-ro and /media/root-rw. This indicates clearly that OverlayFS was enabled successfully.
Regarding our partitioning table: /opt/ is still mounted as read-write as defined during installation and is therefore not affected from the overlay root protection – Check ✅ .
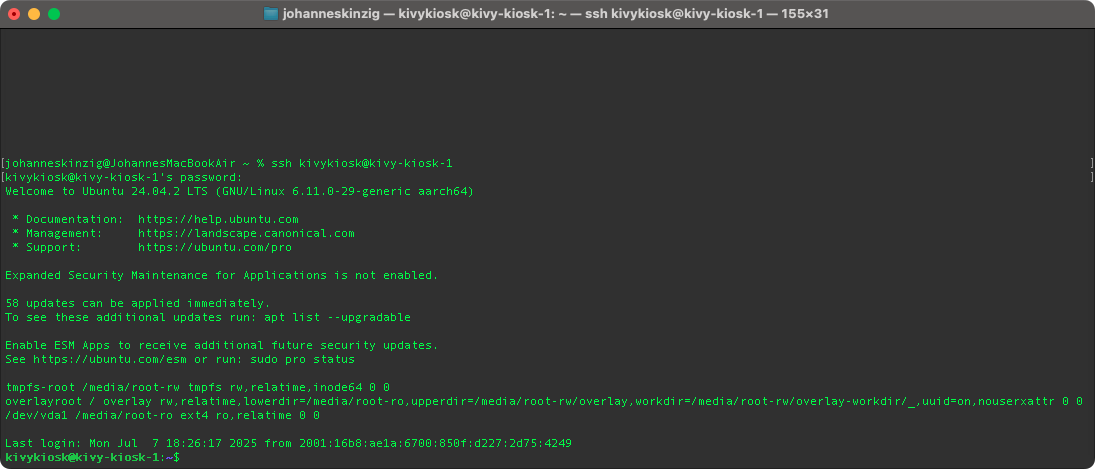
When you ssh into your system with overlayroot enabled you will see this in the welcome message.
Disable OverlayFS
OverlayFS can be disabled at any time restoring read-write functionality on the / partition. Since / is write protected, we cannot simply edit our /etc/overlayroot.conf.
First, we need to access the underlying filesystem. This can be achieved by entering a chroot environment. Then we can edit the overlayroot.conf as done in the previous step.
# access underlying filesystem (writable)
sudo overlayroot-chroot

# edit overlayroot.conf
nano /etc/overlayroot.conf
To disable overlayroot, we can simply comment out the second line:
overlayroot_cfgdisk="disabled"
#overlayroot="tmpfs:swap=1,recurse=0"
Then, just exit the chroot environment and reboot the system.
# Exit chroot environment
exit

# reboot for changes to take effect
sudo reboot
The OverlayFS / Update dilemma
OverlayFS protects the system from unwanted changes. This ensures that system integrity is preserved across reboots.
However, this benefit comes with an important trade-off: automatic system updates cannot be applied while OverlayFS is active, because changes do not persist.
As a result, systems using OverlayFS might disable unattended upgrades and rely on planned, manual update procedures where the overlay is temporarily deactivated to perform maintenance, security updates, or configuration changes.
- On the one hand, you want the root filesystem to stay immutable at runtime – no accidental breakage, no filesystem corruption, no unwanted writes.
- On the other hand, you still need to keep the system secure and up to date, which means you must apply updates to the real root filesystem periodically.
There is no universal approach that fully resolves the trade-off between using overlayroot for system integrity and relying on unattended upgrades for automatic patching. One practical option could be to plan regular maintenance windows:
- Disable overlayroot
- Perform all necessary updates and upgrades
- Verify that the system is stable
- Re-enable the overlay protection
This approach allows you to benefit from a read-only root filesystem during daily operation while still keeping the underlying system up to date and secure. Ultimately, the right balance depends on your specific use case, security requirements, and the environment in which the kiosk is deployed. Factors such as physical access, network constraints, and acceptable downtime all play a role in defining the best update strategy for your setup.
Closing thoughts
Setting up a secure, reliable Linux-based self-service terminal isn’t rocket science – but it does require careful, use-case-specific configuration. With the combination of Ubuntu, GNOME Kiosk, and OverlayFS, you’ve got a solid foundation for building a terminal that is robust and easy to maintain. Of course, every deployment is unique – but my goal here was to demonstrate one practical solution using widely available hardware and software.
Up Next: Custom Kivy App for the kiosk
In Part 2, we’ll walk through the steps needed to plug in your own custom Python Kivy app as the main kiosk application instead of Firefox.
If you’d like to stay up to date with future technical guides and project insights, subscribe to my newsletter. I share practical knowledge, lessons learned, and updates – no spam, just interesting content for developers and engineers.